Showing posts with label Jewels. Show all posts

2/11/24

Pretty Pink Posh 10th Birthday Hop - Day 5

Today I am participating in Day 5 of the Pretty Pink Posh 10 Birthday Blog Hop.  I have been a fan of PPP since the beginning! Big congratulations to Paulina! I look forward to seeing what the next 10 years hold. This release has a birthday theme full of fun, happy products. The new release is available now


Be sure to leave a comment for a chance with win one of 5 $30 gift certificates.


I have two cards to share with you. My first card features the new Birthday Cupcakes Stamp Set and the Birthday Cupcakes Dies. I colored the cupcakes with OLO Markers and added some glitter and jewels to the cupcakes for a little sparkle. 


The background is stenciled with the Birthday Words Stencil in four different inks. 


The sentiment is from the new Party Time Stamp Set and the card is framed with the largest die in the Eyelet Rectangles Dies.


Next up is a look at the Party Hats Dies. I die cut the hats in a variety of cardstock colors and starting playing with the colors and patterns. I arranged the hats in a random pattern on the card front. 


The background is embossed with the Pierced Stars Plate Die. Next I stamped another sentiment from the Party Time Stamp Set in Versamark Ink on vellum and embossing with gold embossing powder and added a few gold gems.


GIVEAWAY

Leave comments on each stop. We are giving away 5 $30 gift certificates to random comments (1 winner each day) left before February 16, 2024 at 11:59 PM PST. We’ll be announcing the winners on the PPP blog, so be sure to head there and see if you are one of the winners!

BLOG HOP


4/1/22

Easter on Sale at Pretty Pink Posh

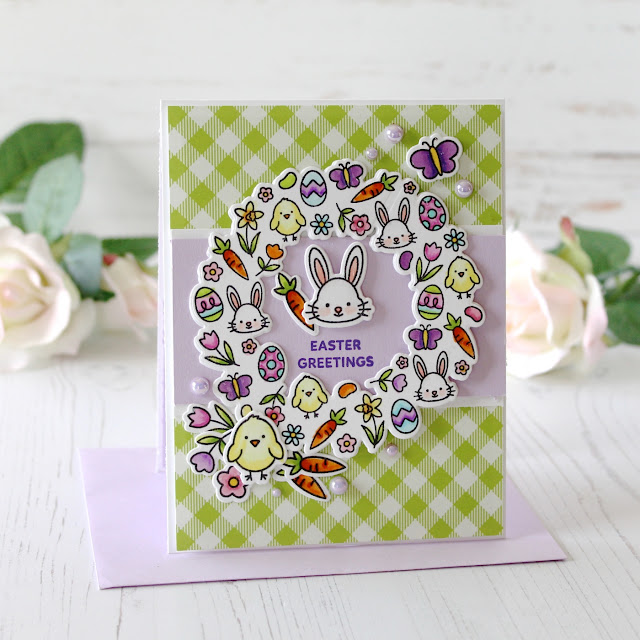
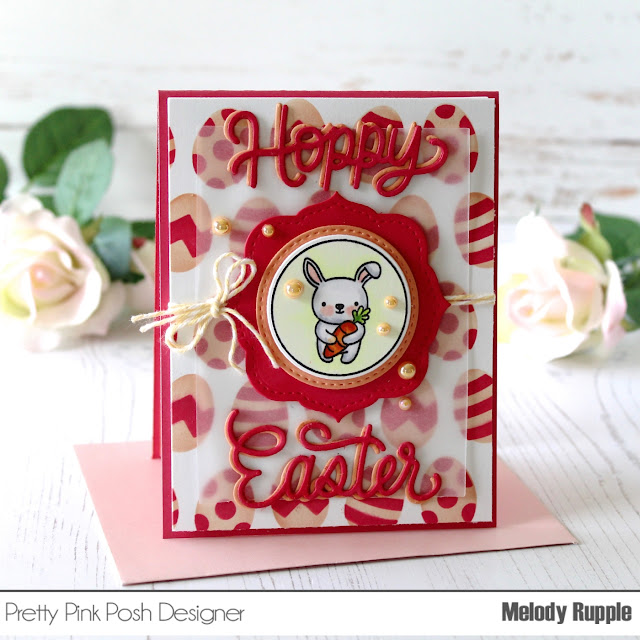
Happy Friday! I have two Easter cards to share with you today. Easter is on sale at Pretty Pink Posh. You can find all the Easter products HERE.  Many of these products can be used throughout the year. 


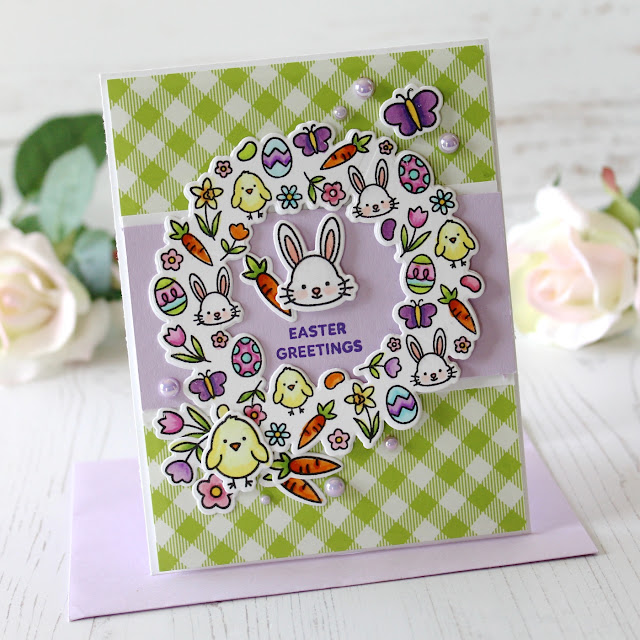
I am a big fan of the wreath collection at PPP. This is the newest Easter Wreath Stamp Set and the Easter Wreath Coordinating Dies. I love that the set comes with the wreath and the smaller images. I find that I use use the smaller stamps as embellishments throughout the year. The wreath is colored with Copic Markers.


I kept the card layout simple, just using a patterned paper for the card front and adding a strip of lavender cardstock across the center. The sentiment is included in the Easter Wreath Stamp Set. I also added a few Pansy Purple Pearls


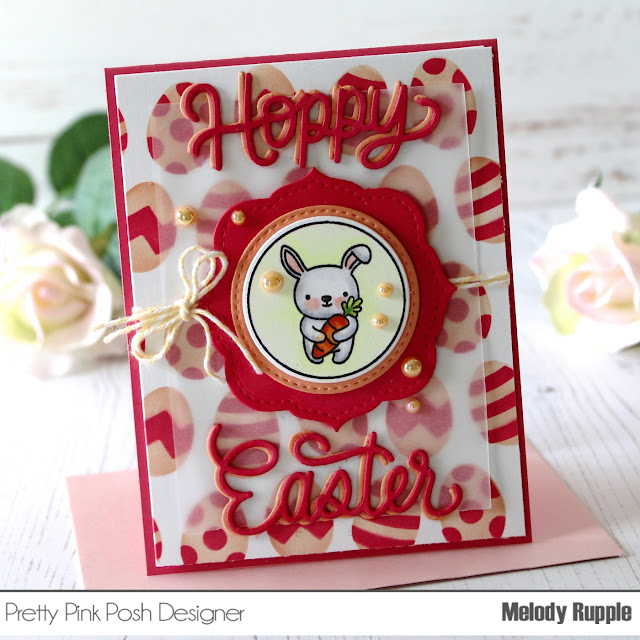
I started by stenciling the eggs with a pale peach and guava ink and then I added a panel of vellum to soften the design. I stamped the cute bunny and colored with Copic Markers. The image is die cut and matted with the Easter Circles Coordinating Dies


I die cut the Hoppy Easter Script Dies twice from different color cardstock and layered one on top of each other but slightly offset. I added tied twine across the center of the card and finished off with a few Creamsicle Pearls

Have a great weekend! Hope you have time to do something creative!


12/1/21

Spellbinders Large Die of the Month for December

Hi All! It's December 1st and time for  a look at the Large Die of the Month for December at SpellbindersThis month's Layered Stitched Background Large Die Set is perfect for making cards, decor, and more. The set features 6 cutting dies.

Membership Includes:

Exclusive Larger Set of Versatile Dies that cut, emboss, deboss and stencil. Double the size of the Small Die Set! $40 Value!

Project Inspiration: Each kit will feature project ideas with at least one detailed how-to instruction tutorial each month.

Member Benefits & Savings: Receive exclusive member pricing in the Spellbinders store. Plus receive access to deals, savings, and gifts - only available to members.


If you like to add hand stitching on a card this one is for you. I used one of the six dies to die cut the black cardstock. This die cuts all the details you need to add the stitching. If stitching is not for you the die cuts look great with a different color cardstock under the black. I the used gold floss included in the DMC Essential Metallics Diamant Metallic Thread Bundle.


Once I was done with the stitching I cut one of the dies from white cardstock and a second die from Mirror Gold Cardstock 8 1/2" x 11 - 10 Pack. You can how beautifully the die cuts layer together over the stitching. I used the same die as the one I used for the gold die cut to create the white background pattern. 


The diamond borders are also created with dies included in this month's club. The sentiment is created with a previously released Clear Stamp of the Month Club

Thanks for stopping by today! 

10/15/21

Pretty Pink Posh Holiday Release Blog Hop Day 3

Hi and welcome to Day 3 of the Pretty Pink Posh Holiday Release Blog Hop! Be sure to leave comments on each stop. We are giving away 3 $25 gift certificates to three random comments (1 winner each day) left before October 19, 2021 at 11:59 PM PST. The  winners will be announced  next week on the PPP Blog, so be sure to return and see if you are one of the winners


I have two cards to share with you showcases the new Elegant Poinsettia Die. Link are listed below. 

On my first card I went with a less traditional color scheme with a pale pink and green. I cut the frame for the elegant Poinsettia from white glittered cardstock and then inlayed the die cuts for the flowers and greenery back into the frame. To add the color I simply sprayed white cardstock with Distress Mica Stain in Winterberry, Holly Branch, and Tree Lot. This adds a really pretty sheen and make the card easy to create. 


I framed the card with the Winter Frame Die cut from white glittered cardstock. Behind the frame I just added white cardstock blended with Spun Sugar Oxide Distress Ink. The sentiment is die cut with the Seasons Greetings Script Dies. I cut the die three times and layered the die cuts on top of each other. I added Pearl White Jewels to the center of the flower. 


Here is a more traditional card with the same die. This time I cut the frame of the poinsettia from gold foil and used Peppermint Stick, Holly Branch, and Tree Lot Mica Stain to add the color. I added extra pine branches with the Pine Sprigs Dies cut from a combination of white cardstock and gold foil. 


The sentiment is created with new Christmas Candles Stamp Set and Coordinating Dies. I framed the card with a die in the Nature Essentials Dies. I added the new Metallic Gold Pearls to the center of the poinsettia. 


Be sure to leave comments on all the stops- PPP be randomly picking comments to win gift certificates. Thanks for joining us! Here is the list of today's blog hop designers. 


10/4/21

Sending Warm Holiday Wishes

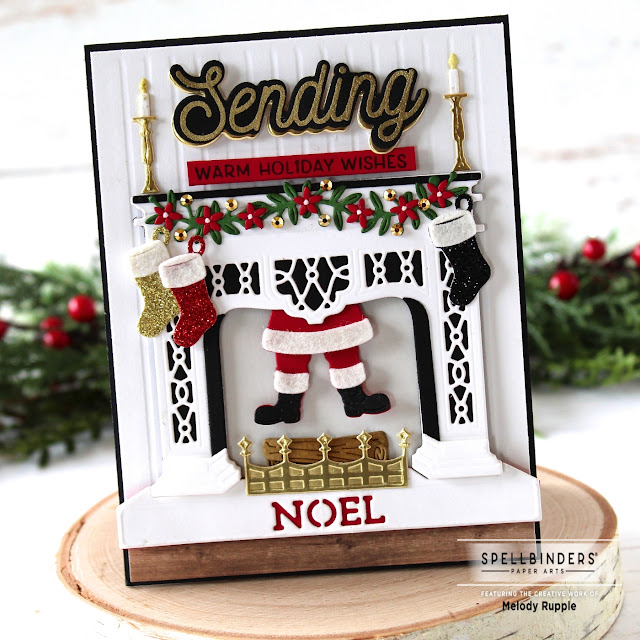
Hi All! I am starting off the week with a card I created with the Spellbinders Large Die of the Month for October, Santa's Fireplace. This month's set is so cute for the holidays! 

Membership Includes:

Exclusive Larger Set of Versatile Dies that cut, emboss, deboss and stencil. Double the size of the Small Die Set! $40 Value!

Project Inspiration: Each kit will feature project ideas with at least one detailed how-to instruction tutorial each month.

Member Benefits & Savings: Receive exclusive member pricing in the Spellbinders store. Plus receive access to deals, savings, and gifts - only available to members.


Santa's Fireplace has so many dies with great details that allow you to use the fireplace dies in a number of different way. I added Santa to my card but there are dies to add a fire to the fireplace and a number of different sentiments. 


I used white felt to add the trim to Santa's clothes, glittered Cardstock for the stockings, and gold foil for the fireplace grid. I like the look of the mix of the different textures. 


The top sentiment is from this month's Clear Stamp of the Month, Sending You. I finished off the fireplace with candles and garland. 

Have a great week!


9/9/21

Loveliest Fall Greetings

 Hi and thanks for stopping by today! I have another fall card to share with you that I created with the new Wagon Full of Fall Etched Dies from the Happy Harvest Collection by Nichol Spohr from Spellbinders. This is a set of 13 thin metal dies. You can fill the wooden wagon with fall items including sunflowers, pumpkin, gourd, apples and more!


I filled my wagon with all the dies in the set so you could get an idea of the variety of fall dies. I die cut the items from a white cardstock and the blended distress inks in a variety of fall colors. 


I love all the details the etched dies create. The dies create the texture on the wood on the wagon and the nail heads on the wagon frame. I added a gold with the gel pen to the nails. 


I created background by stenciling clouds in the background and blending Forest Moss Distress Ink for the grass. Then I splattered the background with gold paint. I also added a few Metallic Gold Jewels. 


Thanks for taking a look! 

8/2/21

Spellbinders Large Die of the Month for August

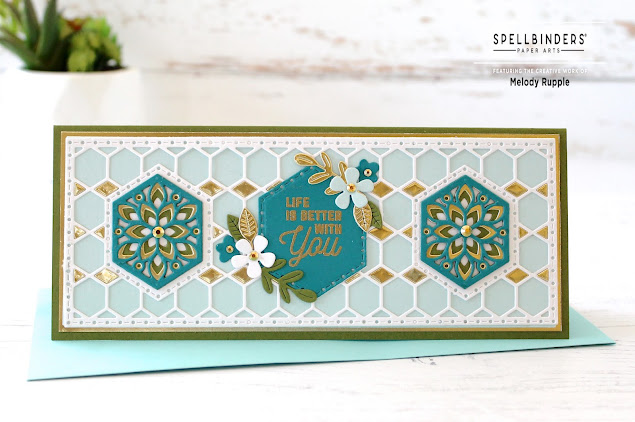
Spellbinders released all the August Club products yesterday. I am starting off the week with a card I created with the August Large Die of the Month, The Hex Kaleidoscope Slimline Large Die set is perfect for making cards, decor, and more. 

Membership Includes:

Exclusive Larger Set of Versatile Dies that cut, emboss, deboss and stencil. Double the size of the Small Die Set! $40 Value!

Project Inspiration: Each kit will feature project ideas with at least one detailed how-to instruction tutorial each month.

Member Benefits & Savings: Receive exclusive member pricing in the Spellbinders store. Plus receive access to deals, savings, and gifts - only available to members.

The Hex Kaleidoscope Slimline Large Die set creates a slimline card with lots of details with the dies in the set. First I die cut the background and the decorative top layer, gluing the decorative panel over the background. I also added a gold matting behind the panel. 


Next I die cut the three hexes to make the decorative  tiles on each side of the card. You can see how the three hexagons layer together. I just love the details! I added a solid hex to the center and stamped a sentiment from this month's Hex Tile Stamps Clear Stamp Set. The sentiments in the stamp set fit perfectly inside the hexes. 


I die cut the decorative die again from Mirror Gold Cardstock and inserted the smaller diamond back into the front panel. I added the flowers with a die from a previously release Large Die of the Month. 

Thanks for starting your week off with me. You can find all the details on the Club HERE


7/29/21

Blessed To Be Your Friend

Thanks for stopping today! I up on the Papertrey Ink Blog with a new Cover-Up Challenge. You can find all the details on how you can play along in the challenge here. 

By the first of August I find myself transitioning my crafting to Fall. I’m always ready to work with the beautiful rich colors of fall and start thinking about the fall holidays.  Using touches of gold is one of favorite ways to add warmth to a project.


My card is created with the Leaves in Fall Stamp Set and Dies. I stamped the leaves in Simply Chartreuse and Ripe Avocado Inks. Then I splattered the leaves with gold paint. I die cut a gold frame with the Border Bling: Skinny Diagonals Frame Die.

 I wrapped gold twine around the branches. I finished off with a few gold jewels.

Stop by the PTI Blog for all the details HERE


7/11/21

Ink to Paper July Sneak Peeks Day 1

Hi and welcome to Day 1 sneak peeks at the Ink to Paper July Release Sneak Peeks. July's release is full of pretty florals, an addition to the new Vase Collection, and new birthday products.  Everything will be available for purchase beginning at 10 PM EDT on July 15th!

I have a number of projects to share with you so let's get started! 


I have three projects to share with the new Prosperous Perennials Stamp Set and Dies. To create the background on my first card I die cut the Tin Border Bing: Tin Stitch Die from Stamper's Select White Cardstock, lightly blended Spring Rain Ink on the white background, and stamped the leaves from the new stamp set in Spring Rain Ink . 


I die cut circle hello sentiment from the new On the Border: Leaves Die from Blueberry Sky Cardstock and added a doily cut with the Delicate Doilies Die behind the sentiment. I added the flowers and leaves I stamped with the set around the circle and finished off with white jewels. 


The On the Border: Leaves Die comes with the border die I used on this card and the circle hello I used with the first card. I cut the border from Stampers Select White Cardstock and then added a layer of vellum and Spring Moss Cardstock behind the leaves. 


I arranged the flowers and leaves on a circle that I die cut with Love to Layer: Scalloped Circle Die. I cut the circle from white cardstock and blended Aqua Mist Ink. The sentiment is included in the stamp set. 


On my third card I used both of the dies in the On the Border: Leaves Die together. You can see how the circle fits perfectly inside the leaves. 


I cut the sentiment from white cardstock and inlayed it back into the circle. 


Next up is a look at the new Prosperous Leaves Background Stamp and the new Feathered Friends Mini 13 Stamp Set and Dies. I stamped the Prosperous Leaves Background Stamp on Stamper's Select White Cardstock in Versamark Ink and embossed with White Embossing Powder. Then I blended Aqua Mist Ink over the white embossing. 


I stamped the bird with the Feathered Friends Mini 13 Stamp Set. The branch is stamped with the previously released Feathered Friends Mini 8 Mini Stamp Set and the leaves from the new  Prosperous Perennials Stamp Set. Behind the bird I added a circle of vellum. The sentiment is included in the stamp set. 

Thanks for taking a look! I will be back tomorrow for Day 2 of sneak peeks. Stop by the Papertrey Blog for more more inspiration with the new products.


7/7/21

Spellbinders Large Die of the Month for July

I am popping in today with a project I created with the Spellbinders Large Die of the Month for July, Mini Slimline Envelope & Nested Card Creator. This a group of mini slim dies that nest together and the dies to create a envelope! 

Membership Includes:

Exclusive Larger Set of Versatile Dies that cut, emboss, deboss and stencil. Double the size of the Small Die Set! $40 Value!

Project Inspiration: Each kit will feature project ideas with at least one detailed how-to instruction tutorial each month.

Member Benefits & Savings: Receive exclusive member pricing in the Spellbinders store. Plus receive access to deals, savings, and gifts - only available to members. 


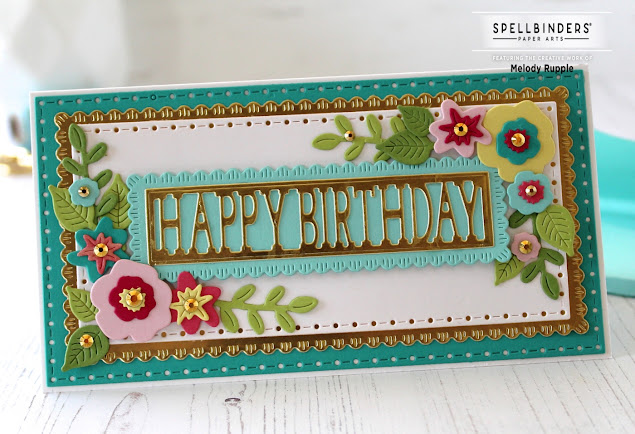
You can see here how the dies nest together. I love the different details on the edges of each dies. This really adds nice interest to the card. Behind the card you can see the envelope I created to coordinate with the card. 


First I die cut the nesting rectangle in different cardstocks, including the sentiment. The sentiment is cut from Spellbinders Mirror Gold Cardstock. This cardstock is really pretty in person. I can see using it throughout the holiday season. 


Then I die cut the flowers and leaves with dies that are included in this month's die set. I layered them around the edges of the card and added gold jewels to the centers of the flowers. 


Thanks for visiting my blog! You can find all the Spellbinder Clubs here