Showing posts with label Birthday. Show all posts

2/20/25

Wild Blooms Birthday

Hi and thanks for stopping by! It has been busy at my house and I haven't spent much time in my craft room. But I needed a birthday card so I spent some time making a card last night. A stencil is alway a good choice when you are short on time! 


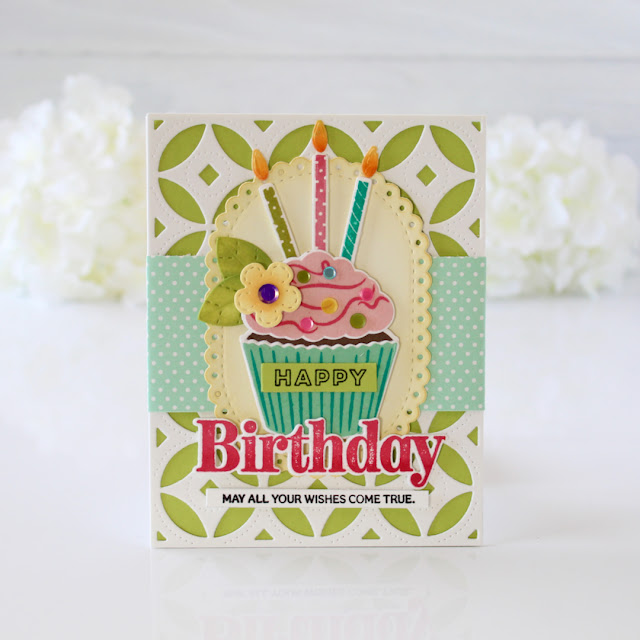
I decided on the Wild Blooms Stencil from Papertrey Ink. This is a set of 6 stencils that create this beautiful background for your card. You do not need to added much else. 


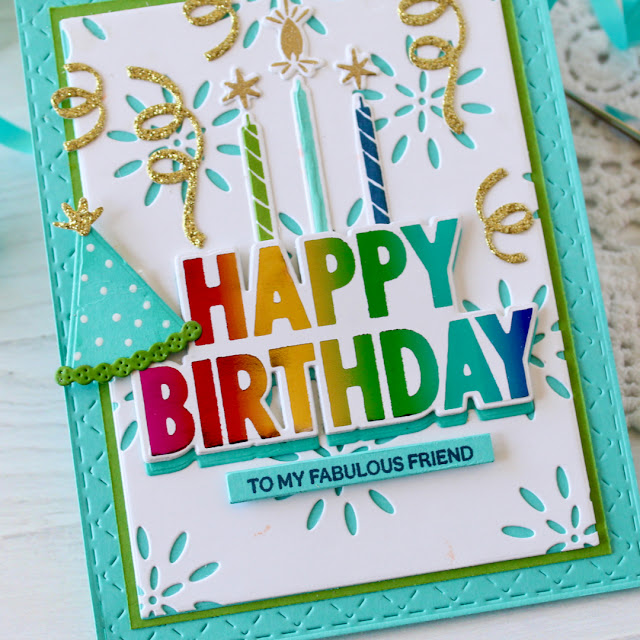
I stenciled in the PTI inks I have listed below. I also blended New Leaf Ink at the bottom of the card and Speckled Egg Distress Ink at the top of card. Then I splattered the background with white paint. 


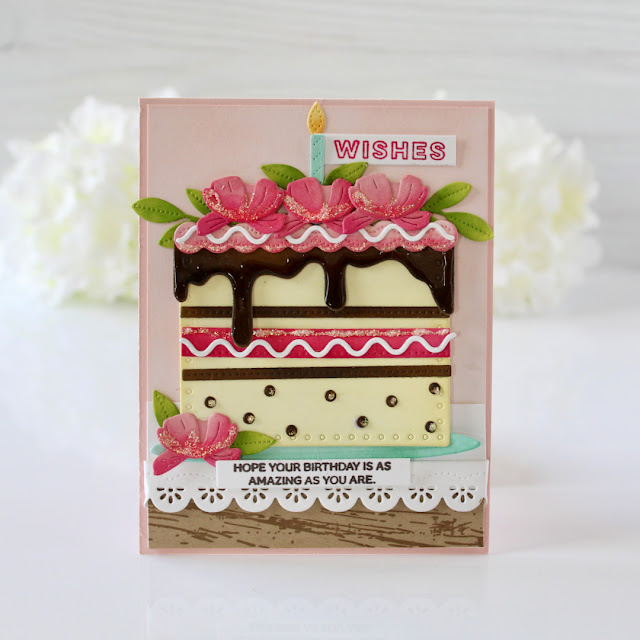
To add a little more texture I die cut flowers and leaves with the Into the Blooms: Clover Die. I die cut from Stamper's Select White Cardstock and the blended Pure Poppy Ink on the flowers and New Leaf and Pinefeather on the leaves. 


The sentiment is from the Birthday Your Way II Stamp Set and die cut with the coordinating dies. I added a strip of vellum and then glued the sentiment to the vellum. I added yellow gems to the center of the flowers. 

Supplies:

Stamps: Birthday Your Way II

Dies: Birthday Your Way II, Into the Blooms: Clover Die, Love to Layer: Torn Edges

Ink: Pure Poppy, Scarlet Jewel, Lemon Tart, Mint Julep, New Leaf, Pinefeather, Tropical Teal

Paper: Stamper's Select White, Pure Poppy, Vellum

Other: Wild Blooms Stencil, White Paint, Yellow Gems, Speckled Egg Distress Ink

Have a great day! 

2/4/25

New Gumdrop Ink and Cardstock

Hi Friends! Taylored Expressions is adding a new color of ink and cardstock to the TE catalog today, Gumdrop! I have a few projects to share with you that will give a good look at the new color which is available now in the TE Store


I have really been trying to experiment with some new color combos. I can get in such a rut! I am happy with how this one turned out. I used the new Gumdrop Ink with Confetti Cake, Blueberry, Potato Chip, Macaron, and Dill Pickle Inks. 


I used the Fan Favorite Layering Stencil for this card. This set of 6 stencils that layer together to create colorful paper fans. To the middle of the fans I added TE Enamel Dots in Dried Fig and Cookie Monster. 


Once I had stenciled the background I embossed with the Fan Favorite 3D Embossing Folder. The embossing highlights the design and adds texture and depth. 


The sentiment is from the Fantastic Birthday Stamp Set and die cut with the coordinating Dies. I stamped the sentiment in the new Gumdrop Ink. 

My next project features the new Gumdrop Cardstock. I created a set of tags with the Monster Squad Die Set.  I have always loved these dies. So fun for kids birthday presents. I used a combination of Gumdrop, Cupcake, Fruit Punch, Granny Smith, Macaron, Licorice, and TE Gold Glittered Cardstocks. 


I die cut the tags with Tag Stacklets 2 and the Pierced Tag Stacklets 2 Dies. I splattered gold paint on the backgrounds of each tag. I used dies in the Gnome Alone - Birthday Dies to add the balloons and cupcake.  


All the sentiments are from the Fantastic Birthday Stamp Set and die cut with the  Fantastic Birthday Stamp Dies. I used Oreo Enamel Dots for the eyes of my monsters. 


Gumdrop is available in inks, cardstock and envelopes! We also have an I Want it All Bundle for an easy one click to add everything to your cart.

Thanks for stopping by! Visit the TE Blog for all the details, videos, and more inspiration from the team.


1/28/25

Treat Your Shelf

Hi Friends! I am excited to start off the week with the first cardmaking kit of the year from Taylored Expressions! The Treat Your Shelf Cardmaking Kit is here, and it’s perfect for all the book lovers in your life. I can't wait to make bookmarks for the members of my book club. 


Here is my group of projects I made with the kit to share with you first, two cards and two bookmarks. 


For the backgrounds of my cards I used the Pixie Petals Background Stamp, stamping Versamark Ink on Blue Raspberry Cardstock and embossing with TE White Embossing Powder. 


I used  a Foil It - Treat Your Shelf Panel with the Treat Your Shelf Layering Stencil to create my stack of books. I used TE Gold Foil with my Mini Minc Foil Applicator. I used a variety of ink that I have linked below. Once the books were stenciled and foiled I die cut with the coordinating Treat Your Shelf Dies. 

I mounted the books on a rectangle die cut and matted with Stitched Rectangle Stacklets and Petite Scallop Rectangle Stacklets. 


All the sentiments are from the One for the Books Stamp Set and die cut with the One for the Books Dies, available for purchase separately. On this card I used the Stitched Oval Stacklets and the Petite Scallop Oval Stacklets behind the books. Notice the clouds in the background. I used the Cloudy Skies Piercing Plate to achieve the look. 


I am loving these two bookmark options. I used the Bookmark Builder Die for the long bookmark. I just die cut books from different colored cardstocks and stacked the books on top of each other. 

The corner bookmark is die cut with the Get Thready - Corner Bookmark Die which creates a bookmark that fits perfectly on the corner of the page. I used TE Felt and DMC Embroidery Floss. I love the look and can't wait to make more of these. 


Here's a look at a couple of The Insiders - Treat Your Shelf Panels. I foiled the sentiments with TE Foil in Cookie Monster. 


The Treat Your Shelf Cardmaking Kit includes:
  • Treat Your Shelf Layering Stencil
  • Treat Your Shelf Coordinating Dies
  • Treat Your Shelf Clear Stamp
  • The Insiders - Treat Your Shelf
  • Taylored Tutorial instruction sheet
Kits go fast and most items are not available to purchase outside the kit. New to the kits this year, we’re introducing the Taylored Tutorial instruction sheet, which provides step-by-step guidance for creating a special project using the kit's contents.

Coordinating products outside of the kit include:

We also have the Big Book Bundle, which includes the kit along with each of the additional coordinating products for one of everything.


Thanks for stopping by! Visit the TE Blog for all the details, videos, and more inspiration from the team.

1/27/25

Papertrey Ink January Release Countdown Day 4

Hi and welcome to the final day of the Papertrey Ink January Release Countdown. I have three more projects to share with you featuring the new Cover Plate: Geo Flowers, Happy Birthday Hot Foil Plate, and the In Stitches: Cake Builder dies. All the new products will be available at 12 PM EST tomorrow!


My first projects features the Cover Plate: Geo Flowers, Happy Birthday Hot Foil Plate, Build-A-Party Hat Dies. 


First I create the party hat. There are three different sizes of dies for the party hats. This is largest. I used felt to die cut the fringe and the hat topper. I stenciled the polka dots on the hat and then added the flowers and greenery with dies that are included in the Build-A-Party Hat Dies. 


I used the Happy Birthday Hot Foil Plate and Die to add the sentiment. I used a gold foil. 


I used the Cover Plate: Geo Flowers to create the card front. I die Stamper's Select White Cardstock and then blended Green Parakeet, Sweet Blush, and Lemon Tart Inks. Then I splattered gold paint on the background.

Supplies:

Dies: Build-A-Party Hat, Cover Plate: Geo Flowers, Happy Birthday Hot Foil Plate
Ink: Sweet Blush, Lemon Tart, Green Parakeet, Raspberry Fizz, Aqua Mist, Hawaiian Shores
Paper: Stamper's Select White, Aqua Mist
Other: Happy Birthday Hot Foil Plate, Gold Foil, Gold Paint, Gold Gems, Felt


On my second card I used the Happy Birthday Hot Foil Plate and Die with a rainbow foil. It makes a nice focal point for the card. 


I stamped and die cut the candles with the new The Bigs Birthday Style Stamps and Dies. The party hat is the smallest hat die in the Build-A-Party Hat Die Set. 


The confetti is also from the Build-A-Party Hat Die Set. 


The card front is die cut with the Border Bling: Tin Stitch Die.

Supplies:
Stamps: This is Big Sentiments: Birthday
Dies: Build-A-Party Hat, Cover Plate: Geo Flowers, Happy Birthday Hot Foil Plate
Ink: New Leaf, Hawaiian Shores, Enchanted Evening, Dark Indigo, Versamark
Paper: Stamper's Select White, Hawaiian Shores, New Leaf
Other: Rainbow Foil, Gold Glittered Cardstock, White Gel Pen, Gold Embossing Powder


My final card features the new In Stitches: Cake Builder Dies. There are a number options for layering and decorating the cake. 


I added glossy accents to the chocolate frosting and Diamond Stickles to add the sparkle. The sentiments are from the This is Big Sentiments: Birthday. 


Here's a closer look at the cake. 


I used the On the Edge: Scallops Collection Die to added the scalloped trim and the Weathered Wood Background Stamp at the bottom of the card. 

Stamps: This is Big Sentiments: Birthday, Weathered Wood Background 
Dies: In Stitches: Cake Builder, On the Edge: Scallops Collection Die
Ink: Sweet Blush, Raspberry Fizz, Cocoa Bean, Green Parakeet, New Leaf, Classic Kraft, Aqua Mist, Summer Sunrise
Paper: Stamper's Select White, Cocoa Bean, Green Parakeet, Aqua Mist
Other: Stickles in Diamond, Glossy Accents, Distress Ink in Worn Lipstick

Thanks for stopping by today. Stop by the PTI Blog for more inspiration from the team. 


1/26/25

Papertrey Ink January Release Countdown Day 3

Welcome to Day 3 of the Papertrey Ink January Release Countdown. I have two more projects to share with you featuring the new Build-A-Party Hat Dies and Reflections: John 1 Stamp Set and Die.  All the new products will be available at 12 PM EST on Tuesday, January 28th!


The Reflections: John 1 Die die cuts this frame. I used Sweet Blush Cardstock, cutting it twice, and gluing the layers together to add some depth. 


Next I stenciled the background with the Berry Branches Stencil Collection. This is a set of four stencils. I have listed the inks I used below. After I stenciled the background I used the  Reflections: John 1 Die  again and inlayed the die cut pieces back into the frame. 


I stamped the sentiment in the middle and added a bow with crinkle ribbon. 

Supplies:

Stamps: Reflections: John 1
Dies: Stamps: Reflections: John 1
Ink: Sweet Blush, Pale Peony, Hibiscus Burst, Classic Kraft, Spring Moss, Simply Chartreuse, Pure Black
Paper: Sweet Blush, Stamper's Select White
Other: Berry Branches Stencil Collection, Crinkle Ribbon, Blender Brushes


Next up is the Build-A-Party Hat Dies. There are three different sizes of party hat dies and numerous dies to add accents to the hats. This is the middle sized hat. 


The background is die cut with the new Cover Plate: Geo Flowers Die. I added Tropical Teal behind the die cuts. 


The sentiments are from the new This Is Big Sentiments: Birthday. 


I used accents of gold glittered cardstock and teal gems to add the sparkle. 

Supplies:

Stamps: This is Big Sentiments: Birthday
Dies: Build-A-Party Hat, This is Big Sentiments: Birthday, Cover Plate: Geo Flowers
Ink: New Leaf, Amethyst Allure, Tropical Teal
Paper: Stamper's Select White, Tropical Teal, Green Parakeet, Lilac Grace, Raspberry Fizz, Lemon Tart
Other: Gold Glittered Cardstock, Teal Gems 

Thanks for stopping by today. I will be back tomorrow with more projects from the January Release. Stop by the PTI Blog for more inspiration from the team. 


1/25/25

Papertrey Ink January Countdown Day 2

Welcome to Day 2 of the Papertrey Ink January Release Countdown. I have two more projects to share with you featuring the new The Bigs Birthday Style Stamp Set and Dies and the Line It Up: Birthday Dies.  All the new products will be available at 12 PM EST on Tuesday, January 28th!


My first projects features The Bigs Birthday Style. I created the sweet layer cake and stamped the sentiment that fits perfectly on the three layers. I die cut the frosting three times, glued the layers together and add the frosting over the layers of cake. 


For the cake plate I stamped in Versamark Ink and embossing with Gold Embossing Powder. 


I used the Lover to Layer: Scalloped Oval to die cut the center oval. I blended Sweet Blush and Hibiscus Burst Inks on the background. 


The bottom sentiment is from the This is Big Sentiments: Birthday. 

Supplies:
Stamps: The Bigs Birthday Style, This is Big Sentiments: Birthday
Dies: The Bigs Birthday Style, Love to Layer: Scalloped Ovals
Ink: Pale Peony, Pure Poppy, New Leaf, Versamark
Paper: Stamper's Select White, True Black, 
Other: Various Inks, Gold Sparkle Embossing Powder, Gold Gems, Lace, Twine


The Bigs Birthday Style Stamp Set also includes the Balloons and stamped sentiment on this card. For the balloons I stamped in Versamark Ink, embossed with white embossing powder, and blended Spring Rain and Mint Julep Inks. 


The background is stenciled with the Sunburst Stencil and Lemon Tart Ink. Then I stamped the stars in Pure Poppy, Blueberry Sky,  and New Leaf Ink. 


I used the Into the Blooms: Spring Wreath to add the flowers. 

Supplies:
Stamps: The Bigs Birthday Style
Dies: The Bigs Birthday Style, Line It Up: Birthday, Love to Layer: Torn Edges, Into the Blooms: Spring Wreath
Ink: Lemon Tart, Summer Sunrise, Mint Julep, New Leaf, Spring Rain, Blueberry Sky, Pure Poppy, Versamark
Paper: Stamper's Select White, Pure Poppy, Blueberry Sky
Other: Sunburst Stencil, White Embossing Powder, Blender Brushes, PTI Clear Gems

Thanks for stopping by today. I will be back tomorrow with more projects from the January Release. Stop by the PTI Blog for more inspiration from the team. 

1/24/25

Papertrey Ink January Release Countdown Begins!

Welcome to Day 1 of the Papertrey Ink January Release Countdown. The January Release if full of new Birthday related products and if you are like me you can never have enough birthday cards! All the new products will be available at 12 PM EST on Tuesday, January 28th!

Let's start with a look at the Blooming Beauties Stamp Set and Dies, the Love to Layer: Scalloped Ovals, and the This is Big Sentiments: Birthday


I love the pretty, delicate flowers I created with the Blooming Beauties Stamp Set and Dies. Once I stamped and  die cut the flowers I arranged them into a bouquet and tied the stems together with twine. I added Diamond Stickles to the center of the flowers. 


The pretty scalloped Ovals are die cut with the new Love to Layer: Scalloped Ovals Dies. There are three different sizes of ovals in the set. On the smaller oval I blended Ripe Avocado and Spring Rain Inks. 


I used the previously release Cover Plate: Exquisite Die to created the background of the card. I added Blueberry Sky cardstock behind the die cuts. 


I finished off the card with a sentiment from the stamp set and a few PTI Clear Gems. 

Supplies:

Stamps: Blooming Beauties
Dies: Blooming Beauties, Love to Layer: Scalloped Ovals, Cover Plate: Exquisite Die
Inks: Pale Peony, Scarlet Jewel, Spring Rain, Blueberry Sky, Lemon Tart, Summer Sunrise, Plum Pudding, Winter Wisteria, Simply Chartreuse, Ripe Avocado, Olive Twist, True Black
Paper: Stamper's Select White, Blueberry Sky
Other: Twine, PTI Clear Gems, Stickles in Diamond


Next up is a look at the This is Big Sentiments: Birthday Stamp Set and Dies. I love the Big Sentiments line of stamps. There are so many sentiments in the set that coordinate the larger birthday sentiment. 


I used the Occasional Cupcakes Stamp Set and Dies to created the cupcake. I centered the cupcake on the middle sized oval in the Love to Layer: Scalloped Ovals Dies. 


I used the Cover Plate: Decorative Circles to created the background, adding Green Parakeet Cardstock in the background. 


I added two of the smaller sentiments from the This is Big Sentiments: Birthday Stamp Set. 

Supplies:

Stamps: This is Big Sentiments: Birthday, Occasional Cupcakes
Dies: This is Big Sentiments: Birthday, Occasional Cupcakes, Love to Layer: Scalloped Ovals, Cover Plate: Decorative Circles
Ink: Sweet Blush, Raspberry Fizz, Green Parakeet, Tropical Teal, Aqua Mist, Lemon Tart, Summe Sunrise, Orange Zest, True Black
Paper: Stamper's Select White, Green Parakeet, Bitty Big: Aqua Mist Collection
Other: Sequins, Foam Tape

Thanks for stopping by today. I will be back tomorrow with more projects from the January Release. Stop by the PTI Blog for more inspiration from the team.