12/31/19

A Holiday Thank You

Happy New Year! Welcome 2020! As we kick off the new year I would like to thank all you who stop  by my blog, follow me on Instagram or  Facebook, and take the time to leave me comments and support my work. Thank You!


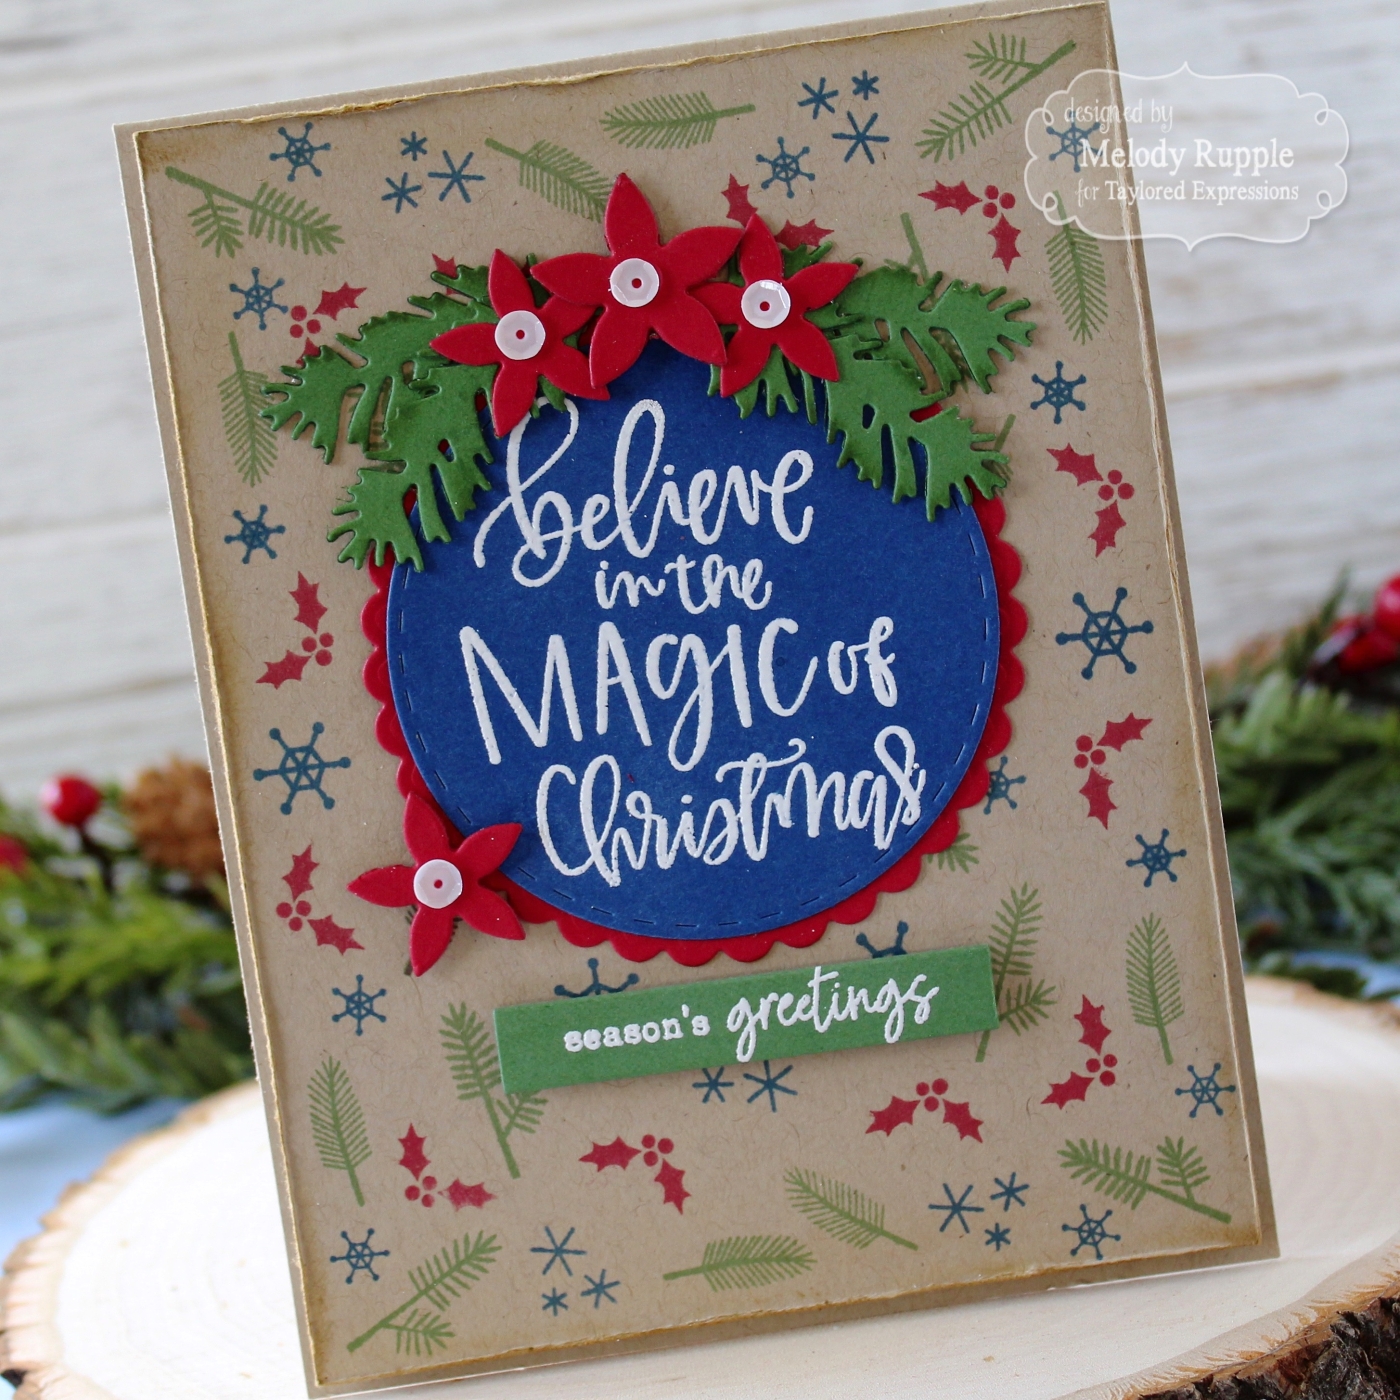
I have a few thank you notes to sent for Christmas gifts so I get to use my Christmas stamps one more time for this year. This pretty stamp set is the Elegant Holly Stamp Set from Pretty Pink Posh. I colored the images with Copic Markers and die cut with the Elegant Holly Coordinating Dies


I kept the background simple, just blending Tumbled Glass Distress Ink on white cardstock. The "thank you" script is die cut with the Thank You Script Die. I die cut twice from red cardstock, and layered the die cuts for more depth. I finished off the card with red jewels from the Holiday Jewels Mix

Wishing you the best in 2020! 


12/21/19

Warm Winter Wishes

Hi All! I know my blog has been a little quiet! Such a busy time of year. I made this card a few weeks ago but I am just now finding the time to share the details. Once I am done with my Christmas cards I like to look at my holiday products and see if I can get a little more use out of them during the Winter Season. The Winter Scene Die from Pretty Pink Posh was one of my favorites products from the PPP Holiday Release and works perfect through the winter.


Let's start with the background. I cut a piece of aqua cardstock and a piece of vellum to fit the card front. On the vellum I stamped the snowflake border from the Winter Borders Stamp Set and the sentiment from the Holiday Greetings Stamp Set in Versamark Ink and embossed with white embossing powder. Then I layered the cardstock and the vellum together. 


I die cut the Winter Scene Die twice, once from white cardstock and once from green. I sponged on aqua ink on the sky and add embossing paste to the edges of the snow, and then layered to pieces to create the scene. The branched are die cut with the Pine Sprigs Dies. I finished off the card with a few sequins from the Marshmallow Confetti Mix.

Thanks for stopping by! Best wishes to you in the Holiday season!


12/4/19

Christmas Cheer

Hi! I have one more Christmas card to share today. It is probably the last one for this year, although I hope to create a few more tags. This card features the Holiday Signs Stamp Set and the Layered Tree Dies from Pretty Pink Posh.


I die cut the Layered Tree Dies from green cardstock, stamped Versamark ink on the edges of the tree, and embossed with white embossing powder. The star is included in the die set and cut from gold foil. The hills of snow are die cut with the Scallop Borders Dies. The background is created with distress inks in Blueprint Sketch and Chipped Sapphire. Once I had the background together I splattered on white paint. 

The Santa and the sign are from the Holiday Signs Stamp Set , colored with Copic Markers and die cut with the Holiday Signs Coordinating Dies. I finished off the card with a few Pearl White Jewels

Have a great week and thanks for stopping by!


11/21/19

Happy Holidays!

Hi All!  I am popping in with another Holiday card today. I went a less traditional color scheme for this card, green, pink and white. I used products from Pretty Pink Posh with the Stitched Poinsettias Dies for the center piece of my project.


I cut the Stitched Poinsettias Dies from white cardstock and sponged on just a small amount of pink ink. I layered the three die cuts and then added three Lemon Drop Jewels to the center of the flower and added the leaves. 


I used the Christmas Background Stencil with green ink on white cardstock for the background. I added machine stitching down each side and pink lace across the card. The sentiment is from the Holiday Greetings Stamp Set

Thanks for stopping by! If you would like to follow me on Instagram you can find me HERE, @apapermelody. 

11/14/19

Believe In The Magic of Christmas

Thanks for stopping by today! I have another gift giving idea for you with the All Tucked In Christmas Stamp Set from the Taylored Expressions November Mini Release. The stamp set coordinates with the previously released All Tucked In Die and All Tucked In Windows.


A handmade card and box full of treats makes a great gift for all the people in your life that you want  to let them know that you are thinking of them this holiday season.


I created the background of the my card with the small Christmas stamps in the All Tucked In Christmas Stamp Set. I used Blueberry, Cherry Pop, and Cilantro Ink on Toffee Cardstock. The Season's Greeting sentiment is also included in the stamp set. 


The center sentiment is from the Handlettered Holiday 2 Stamp Set. I stamped in Versamark Ink and embossed with TE White Embossing Powder. I die cut the sentiment with the Stitched Circle Stacklet and matted the circle with Petite Scallop Circle Stacklets. The flowers and greenery are die cut with the Winter Greens Die Set. 


The All Tucked In Die and All Tucked In Windows make this treat box easy to create. I die cut the box with the  All Tucked In Die and then added the stamped images to the background with the All Tucked In Christmas Stamp Set.

Stop by the TE Blog for more inspiration with the stamp set and the links to other designers sharing projects today. 


11/12/19

Tag Team Christmas Kit with Taylored Expressions

Hi Everyone! It is definitely the beginning of gift giving season and this month Taylored Expressions is having a Mini Release with that in mind! Over the next three days we will be sharing projects and products to give your gifts the handmade touch which makes a gift even more special! Today I will be sharing quick and easy gift tags created with the new Tag Team Christmas Kit.


The kit includes a clear stamp, coordinating set of 3 tag dies, red/white twine, eyelets, and cardstock to create up to 30 tags for quick and easy mass-production of tags. The sentiments are a great mix of traditional Christmas greetings and fun, "make you smile" sayings. 


There are so many combinations of stamps to make your tags in the stamp set. The tags can be coordinated to match your wrapping paper. I went with a mix of Watermelon, Granny Smith, Peapod, Confetti Cake, and Oreo Ink. 


I stamped on the patterns in the stamp set at the end of the tags and then the sentiment. I added an eyelet from the kit to each end and then string the twine through to the eyelet. 


On the back of each tag I stamped "To" and "From" in Oreo Ink. 

Stop by the TE Blog for more inspiration with the kit and the links to other designers sharing projects today. 


11/1/19

Wishing You A Blessed Holiday Season

Hi All! I am building my stash of Christmas cards! Today I have a card I created with the Amaryllis Stamp Set from Pretty Pink Posh. I used a mix of Kraft, red, and green.


I stamped the flowers and leaves in the Amaryllis Stamp Set, colored with Copic Markers, and die cut with the Amaryllis Coordinating Dies. To create the background, I cut a piece of Kraft Cardstock for the card front. Then I used the Snowflakes Stencil with a Kraft ink to stencil the snowflakes. I splattered the background with white paint and sponged the edges of the card front with white ink. 


The sentiment is from the Joy Stamp Set. I stamped in Versamark Ink and embossed with white embossing powder. I finished off the card with a few white sequins in the Merry Confetti Mix. I like the mix of the earthy colors! 

Thanks for stopping by! Have a great weekend. 

10/24/19

Easy Birthday Card With The New Taylored Expressions Masking Stencils!

Hi and thanks for stopping by! I am back today with more masking inspiration with the new 6 x 6 Designer Masking Stencil from Taylored Expressions in collaboration with Laurie Willison. I am using the Rectangle Masking Stencil to create a easy birthday card. 


I cut a piece of Sugar Cube Cardstock for the card front. I simply attached the larger of the two Rectangle Masking Stencils with Purple Tape to the card front and using a TE Blender Brush I blended Salt Water Taffy, Sprinkles, and Blue Raspberry Ink. So easy! In the middle of the rectangle I stamped a sentiment from the Handlettered Sentiments Stamp Set. 


The flowers and leaves are all stamped with the Fresh Florals Stamp Set and die cut with the Fresh Florals Dies. My ink combination are linked below. 


Stop by the TE Blog for all the details and more inspiration with the new Masking Stencils. There are  links to the TE team and special guests that are sharing projects . 


10/23/19

New Masking Stencils from Taylored Expressions!

I am back today with another look at the new 6 x 6 Designer Masking Stencil from Taylored Expressions in collaboration with Laurie Willison. I have a card I created with the Oval Masking Stencil


I started by attaching the Oval Stencil to a piece of Sugar Cube Cardstock with Purple Tape. Using my yellow TE Blender Brush I sponged on a light layer of Potato Chip Ink. Then keeping the stencil attached to the cardstock I used the Misti Stamping Tool to stamp the Wildflower Background Stamp in the Oval. The flowers colored with Copic Markers. 


To frame the oval with a different color ink, I taped the Oval Mask over the work I had just completed. Then I sponged Cupcake Ink around the edges. Perfect masking made easy!! I die cut the card front with the Stitched Rectangle Stacklets and matted the card front with the Petite Scallop Rectangle Stacklets. The sentiment is from the Simple Strips - Birthday Stamp Set and die cut with the Simple Strips Die


Stop by the TE Blog for all the details and more inspiration with the new Masking Stencils. There are  links to the TE team and special guests that are sharing projects . Thanks for stopping by! I will be back tomorrow with another project. 


10/22/19

Introducing the Taylored Expressions Masking Stencils!

Today I have a exciting new product to share with you from Taylored Expressions in collaboration with Laurie Willison6 x 6 Designer Masking Stencils! There are four stencils, circles, rectangle, ovals and squares.

No more masking with washi tape hoping your lines are straight and your paper doesn’t rip when you remove it. Simply use Pixie Spray or purple tape to adhere the stencil to the back of your cardstock panel - no more ripping!

There are two lines etched into each stencil for perfect alignment of an A2 card base or the layer just inside an A2 size (4” x 5.25”). Takes the guesswork out of centering the mask!

The stencil mask also includes the solid shape that falls out from the middle allowing you to reverse mask or apply two tones of ink to the project.


My first project uses the Masking Stencils - Circles. I attached a piece of Salt Water Taffy Cardstock to the back of the 6 x 6 Circle Stencil with Purple Tape. I created the background in the circle by blending Lime Zest and Peapod Ink for the grass and I used the Set the Scene - Clouds Stencil and Sprinkles Ink to add the clouds. When I pulled the mask off my circle was perfect! 


Next I taped just the circle mask over the background in the circle I had just created. Then I placed the Folk Art Tulip Stencil one the circle mask and the cardstock and stenciled the background on the rest of the card front. I die cut the card front with the Stitched Rectangle Stacklets and matted the card front with the Petite Scallop Rectangle Stacklets. 

I used the Folk Art - Spring Die to added the Birdhouse, bird and flowers to the circle. The sentiment is included in the Folk Art Phrases Stamp Set. I stamped in Versamark Ink and embossed with TE White Embossing Powder. 


Stop by the TE Blog for all the details and more inspiration with the new Masking Stencils! 


10/17/19

Pretty Pink Posh October Release Blog Hop Day 2


Hi and welcome to Day 2 o f the Pretty Pink Posh October Release Blog Hop. The hop will be full inspiration for Holiday projects!

Be sure to leave a comment as you hop! There are 4 $25 gift certificates up for grabs (two winners each day). Winners will be picked randomly along the blog hop. Comments must be left by 11:59 PM PST on 10/22/2019. Winners will be announced on the PPP blog.


I have two cards to share with you! My first card features the Winter Scene Die and the Leaves & Berries Stencil. To create the background I used the Leaves & Berries Stencil with a white pigment ink. The scene in the center is so easy to create with the Winter Scene Die. The night sky is ink blended and I added embossing paste to hills of snow to add some texture. 


I added the floral embellishment with the new Winter Wreath Stamp Set and the Winter Wreath Coordinating Dies. I stamped in Versamark Ink, embossed with white embossing powder and colored with Copic Markers. The sentiment is from the Holiday Greetings Stamp Set. I finished off the card with confetti from the new Classic Christmas Confetti Mix


Next up is the Joy Stamp Set and the Joy Coordinating Dies. So fun! I stamped "JOY" on white cardstock and colored with Copic markers. Then I die cut a panel of aqua cardstock with the largest die in the Stitched Notes Dies. And then I cut the Joy Coordinating Dies directly into the panel to frame the stamped image. 

I framed the panel with white cardstock and trimmed the edges with the Stitched Borders 2 Dies. The sentiment, Santa hat, and holly are all included in the Joy Stamp Set. I added three red berries to the Santa hat from the new Merry Confetti Mix

Here is the complete blog hop list for today: 

Caly Person       
Thi Lam      
Melody Rupple       
Alix Davis        
Dana Kirby    
Heather Hoffman      


10/16/19

Festive Wreaths Slider Cards

Hi! Today I am sharing a fun die from Spellbinders that creates a slider card. I have created two cards with the Festive Wreaths Slide Card Large Die of the Month Club. The die includes elements to create wreaths for occasions throughout the year and it is on sale!

Save up to 40% off select past club kits www.spellbinderspaperarts.com.  Click Here to view eligible items. Club members must Log In to view club member discounts. Orders are processed in the order that they are received. If you purchase an item that is out of stock, the item(s) will be removed from your order and you will not be charged for that item(s). Offer is for individual consumer use only; not for distribution; excludes clearance items, tax, & shipping. Not valid on any previous web, phone or retail purchases; cannot be redeemed for cash; cannot be combined with any other offer; void where prohibited; limited to stock on hand. Offer only available 10-15-19 to 10-20-19 at 11:59 PST.


My first card is a Christmas card. I die cut a variety of leaves, snowflakes, and flowers from cardstock with the  Festive Wreaths Slide Card Large Die of the Month Club and layered them on the circle that you die cut for the wreath base. I cut a circle of vellum and attached it behind the wreath and added a sentiment. 


The die set comes with a base, slider, and insert dies and instructions to put your card together. I added twine to the slider. When you pull the twine the wreath pop up and shows the hidden sentiment. 


I backed the card with white cardstock so that you can sign the card on the back if you wish, or you could hand write a note in the hidden window. And the card is beautiful to display! 


I went with a fall theme on my second card. It is put together the same way as the first card. I stenciled the background using Kraft cardstock and white ink. 


The "HI" sentiment is included in the Festive Wreaths Slide Card Large Die of the Month Club


Thanks for stopping by! You can find all the products included in the sale HERE


Other products used: 


10/14/19

Happy Holiday! It's October Release Day at Pretty Pink Posh

Hi Everyone! I am excited to start sharing the Pretty Pink Posh October Holiday Release with you. There are seven stamp sets, five new individual dies, and five new stencils! Today I am sharing a look at the new Winter Wreath Stamp Set and Dies.


The Winter Wreath Stamp Set comes with the wreath stamp and a number of individual flowers and foliage, which I love for adding additional detail to projects. The wreath is colored with Copic Markers and then die cut with the Winter Wreath Coordinating Dies. At the top of the wreath I added twine, a poinsettia, and extra leaves and berries. 


The holiday pattern down each side of the card is stamped with the new Winter Borders Stamp Set. This is just of the ways to use the border stamp. I added a panel of cardstock down the middle of card and stamped the sentiment included in the Winter Wreath Stamp Set . The final detail is a few sequins from the new Classic Christmas Confetti Mix

Happy Shopping! You can find all the new products HERE

10/11/19

Grateful for You

Happy Friday! I finished adding a little Fall decor to my home this week. I am definitely enjoying the change in season. So today I have a Fall card to share with you created with products from Pretty Pink Posh.


I used the Grateful Shaker Die as the centerpiece of my card. I used the die twice, once cutting directly in the card front and then again from green cardstock. I inlayed the grateful die cut in the card front and added clear acetate behind the pumpkin to form the shaker. I added foam tape to give the space I need for the sequins and then dropped in sequins from the 6mm Whimsical Forest Sequins Mix and the 4mm Whimsical Forest Sequins Mix


The background is stenciled with the new Pumpkin Background Stencil. I used white pigment ink on Kraft cardstock. I distressed the edges of the card front. The fall foliage is stamped with the Autumn Wreath Stamp Set and die cut with the Autumn Wreath Coordinating Dies. I colored with Copic Markers. The "for you" sentiment is stamped with one of the small sentiments in the Bear Friends Stamp Set. I stamped in Versamark Ink and embossed with gold embossing powder. 

Thanks for stopping by! Have a great Fall weekend.