Showing posts with label Waffle Flower Crafts. Show all posts

4/5/23

Waffle Flower Crafts April Release Blog Hop

Welcome to the Waffle Flower April Release Blog Hop! I’m happy to be hopping with the folks from Waffle Flower to show you all the fun new stuff awaiting you on the Waffle Flower website! Be sure to check out each stop in today’s blog hop for fun, inspiration, and chances to win some of these new release goodies! 


Next on the hop is Amy Rysavy! You can go to Waffle Flower blog for the full list if the blog hop participants.

Giveaways:

For today’s hop, Waffle Flower is giving away $25 gift certificate to THREE lucky winners. You can leave a comment on this blog and along the hop by 11:59pm EST on Sunday April 9th, 2023 for your chances to win. Winners will be chosen at random from the comments left on any of the posts in this blog hop and will be announced on the Waffle Flower Blog on 04/10/2023.

Specials:

From now till April 8th, 2023, all orders placed at waffleflower.com will receive a mysterious gift (No code required!).

For those of you who are new to Waffle Flower, they have a Last Chance section on their website that lists many goodies for 25% off until they are gone! This would be a great place to start your collection! And don’t forget to check out their monthly Flash Sales!


How cute is this background! I used the new Pop-Up Butterflies Panel Die and coordinating Duo-tone Butterfly Stencil Duo to create this background. There are two stencils in the set. You can make each side of the butterfly a different color or add shading to the center of the butterflies like I did on this card. 

I love how the Pop-Up Butterflies Panel Die allows you to pop up your butterflies! 


I added small gold jewels. to the center of the butterflies. The sentiments are stamped with the new Fluttering By Sentiments Stamp Set and die cut with the Fluttering By Matching Die I stamped in Versamark Ink and embossed with gold embossing powder. I lightly splattered gold paint on the background.


Here is my second card I made with the Pop-Up Butterflies Panel Die and the Duo-tone Butterfly Stencil Duo using a different color scheme. After I stenciedl the butterflies I splattered white paint on the background. 


The word friend is die cut with the previously released Oversized Friend Print Die. I die cut the word three times and glued the die cuts together to add more dimension. The smaller sentiment is from the Fluttering By Sentiments Stamp Set.


Next up is a look at the Butterfly Shaker Die and the Butterfly Shaker Coloring Stencil. There are a number of ways to use the Butterfly Shaker Die. Here I cut the larger die directly into the card front and the added a panel of cardstock blended with a lavender behind the cut out. Then I used the smaller die to die cut the stenciled butterfly. 


I used the Pop-Up Butterflies Panel Die to create the background but on this card I did not pop up the butterflies. 


On my next card I used the Butterfly Shaker Die to create a shaker card. I die cut the butterfly frame with the two dies in the set, and then used the larger die to cut a butterfly from acetate and the the stenciled butterfly. I added added foam tape behind the frame to create the shaker. 


I created the background using the Butterfly Shaker Coloring Stencil. The sentiment is also included in the Fluttering By Sentiments Stamp Set.

Thanks for hopping by my blog. You can find the full collection HERE


3/9/23

Cards for Him with Waffle Flower Crafts

Thanks for stopping by today! I have two cards to share with you with new products from Waffle Flower Crafts. I created some more masculine cards but these products are so versatile and could be used to create many types of cards. 


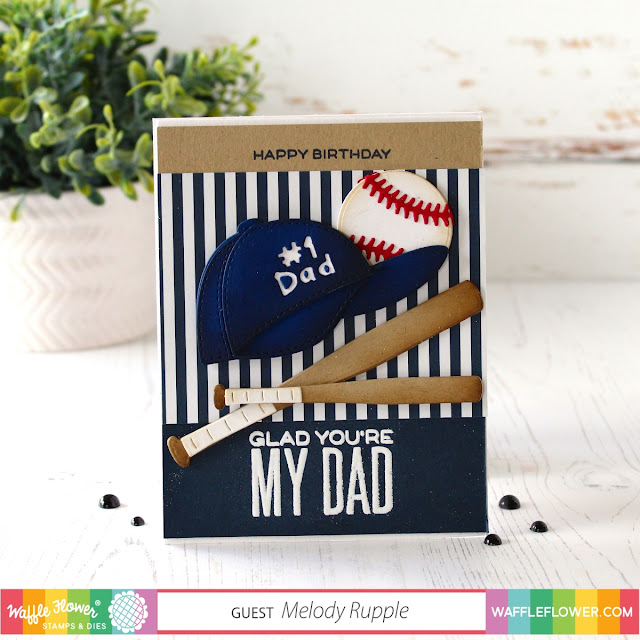
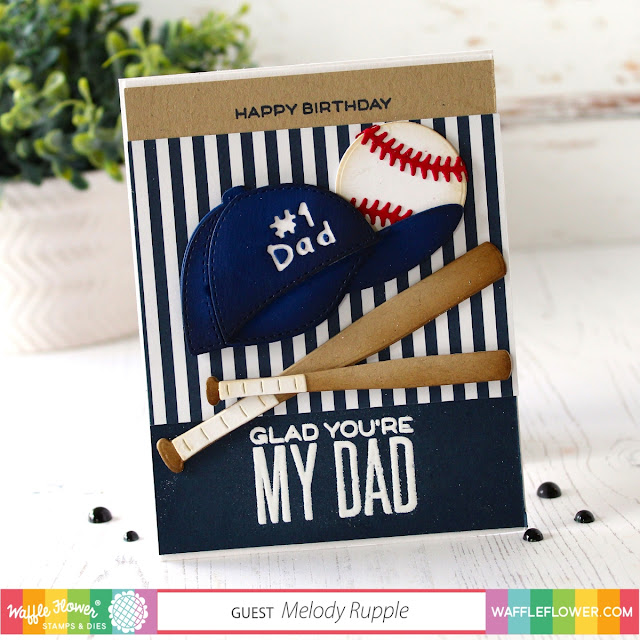
My first card features the Baseball Dad Die and For the Guys Sentiments Stamp Set. I really like this baseball cap. There are three dies that create the hat which adds details and dimension. There is also a die that cuts the sentiment in the hat. It think the baseball hat would also make a cute card for the T-Ball and Little Leaguers in your life. 

I cut the baseball bats from Kraft Cardstock and brushed on a little Distress Ink in Brushed Corduroy. I do like the stitched on the baseball. 


The sentiments are both included in the For the Guys Sentiments Stamp Set. The bottom sentiment is stamped in Versamark Ink and embossed with white embossing powder. 


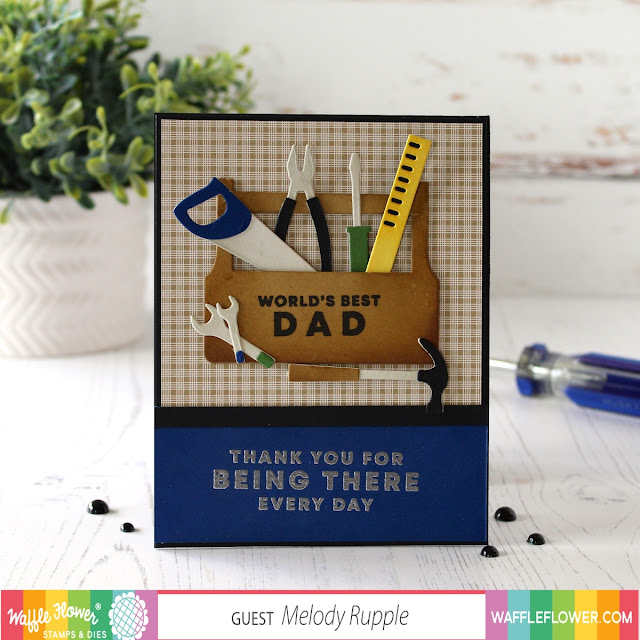
Next up is a look at the Toolbox Die. The set creates the tool box and dies to create the detailed tools. I also used some additional sentiments from the For the Guys Sentiments Stamp Set.


Here is a closer look at the tools. I die cut the tool box three times from Kraft Cardstock and glued the layers together to give the tool box more dimension. I blended Brushed Corduroy Distress Ink on the edges and stamped the sentiment. 


At the bottom I stamped the sentiment in Versamark Ink and embossed with Silver Embossing Powder. 

Thanks for stopping by! You can find the Waffle Flower Crafts New Release here

2/25/23

Waffle Flower February Sneak Peek Club

Today I am excited to share information and projects I created with the new Sneak Peek Club from Waffle Flower. This is a monthly subscription service that allows the club members to play with  a few new items from the next release about a month before the release is public. You can sign up for the monthly subscription plan at any time. You can also skip, pause, or cancel your subscription at any time. You can find out more about the Sneak Peek Club here and on the Waffle Flower Blog

My kit included:

Oversized Friend Print Die

Best Friend Die

Paw Print Stencil. Duo

Friends-n-Family Diecut Sentiments

Foam Strips

Bonus Sentiments

WFC Project Bag and Kit Instructions


I started by creating the background with the Paws Print Stencil Duo. I used a medium grey and black ink. This makes a fun background for all your pet loving family and friends. 


Using the Oversized Friend Print Die, I die cut the word friend three times from red cardstock and layered the die cuts one on top of the other and then added the black matting. Next I added the dogs with the Best Friend Dies. There are many dog silhouettes in the die set. 


The sentiments are included in the kit as Bonus Sentiments. I added a red matting to help the sentiments stand out from the background. I finished off the card with a few black drip dots. 


I am giving away the Waffle Flower February Kit!!  Leave a comment on my blog post and Waffle Craft will pick a winner. Leave a comment by February 27, 2023 for a chance to win the February Kit. The winners will be posted on the Link Party post. Waffle Flower ships the kit to anyone in the US. 

You can subscribe to the Sneak Peek Club HERE.  If you sign up for the Sneak Peek Club now you will receive the next month's kit. 


There is also a Link Party on the Waffle Flower Blog. Stop by the blog for all the details. 

Thanks for taking a peek today!! 

10/11/22

Merry Christmas with Waffle Crafts

Today I have a couple of cards to share with you that created with products from Waffle Flower Crafts. They feature the Winter Crystal Die and the Merry Christmas Duo Stamp Set and the Merry Christmas Duo Matching Die


My first card is simple but striking and easy to create. I cut a piece of red cardstock to fit the card front and then blended red ink in the corners, working towards the middle of the card front. Then I lightly splattered white paint on the red. 


Then I die cut six snowflakes from white cardstock with the Winter Crystal Die and adhered them to the card front, cutting off the edges that hung off the card. Then I simply added a sentiment from the Merry Christmas Duo Stamp Set .   


For my next card I used a deep green cardstock. I stenciled the background with Snowy Pine Trees Stencil. I stenciled with white embossing paste and then added a few gold drops. 


I added another sentiment from the Merry Christmas Duo Stamp Set . I also added a gold matting behind the sentiment. The smaller sentiment is also from the Merry Christmas Duo Stamp Set. I stamped in Versamark Ink and embossed with gold embossing powder. Behind the sentiment I added the pretty snowflakes. 

Thanks for taking a look! Have a creative day!