7/29/21

Blessed To Be Your Friend

Thanks for stopping today! I up on the Papertrey Ink Blog with a new Cover-Up Challenge. You can find all the details on how you can play along in the challenge here. 

By the first of August I find myself transitioning my crafting to Fall. I’m always ready to work with the beautiful rich colors of fall and start thinking about the fall holidays.  Using touches of gold is one of favorite ways to add warmth to a project.


My card is created with the Leaves in Fall Stamp Set and Dies. I stamped the leaves in Simply Chartreuse and Ripe Avocado Inks. Then I splattered the leaves with gold paint. I die cut a gold frame with the Border Bling: Skinny Diagonals Frame Die.

 I wrapped gold twine around the branches. I finished off with a few gold jewels.

Stop by the PTI Blog for all the details HERE


7/26/21

Ellen Hutson and Pretty Pink Posh Instagram Hop


Let’s have fun in the sun and sand, hop with us! The Pretty Pink Posh’s Summer Circles is available now at Ellen Hutson and we’re celebrating with an IG hop! In addition to all the summer time inspiration we’re sharing, we’re also giving you a chance to win a $25 gift certificate to ellenhutson.com too!! Entering is simple, just leave some love for your fellow creators by commenting on their IG hop posts by July 29th at 11:59 PM Pacific, and we’ll pick a lucky person at random to win (winner will be announced the following week). 


Here is my card with The Pretty Pink Posh’s Summer Circles. There are four circles in the set and I used two of them. I colored the images with Copic Markers and then die cut them with the previously released Valentine Circles Coordinating Dies


To create the sand I simply tore a piece of Kraft Cardstock and blended Brushed Corduroy Distress Ink on the edges. The waves are die cut with the Stitched Waves Dies. I cut the waves from white Cardstock and blending Peacock Feathers and Broken China Distress Inks. The sentiment is from the Summer Fun Stamp Set.

Here is list of designers participating in the Instagram Hop. You can find me on Instagram @apapermelody.

Ellen Hutson LLC @ellenhutsonllc

Mona Toth @mona.toth

Emily Mydlowski @popsofpaper

Dana Kirby  @dkirbystamps

Ashley Ebben  @ashley_ebben

Jeanne Jachna  @jeannejachna

Lisa Spangler  @sideoats

Tammy Stark  @paperprettyboutique

Elaine Wakeling @pinkpeppermintcards

Julie Ebersole @jaebersole

Melody Rupple  @apapermelody

Therese Calvird  @lostinpaper

Jane Trivedi  @papercraft4fun

Leica Palma  @leica_crafts

Gemma Campbell @lollipolly

Sandy Allnock  @sandyallnock

Lindsey Larsen  @occasionalcrafting

Mayra D. Hernandez @mayrasdesigns

Pretty Pink Posh @prettypinkposh


Hop on over to @apapermelody to get Instagram Hop going! 

7/23/21

Sew Happy

Happy Friday! Today I have a card I created for Papertrey Ink for the What Do I Do With This Challenge

This month in the What Do I do With This Challenge we are playing with pretty Rain Stones. There are a number of reasons I like to have stones, sequins, and jewels in my supply stash. I use them to add center to flowers, eyes to critters and birds, and to add some sparkle to a project. They are always great for covering up small mistakes like ink smudges and paint splatters that are too large.


My card is created with the new Stitched With Love Stamp Set and Dies. (See links below) The flowers and greenery are stamped in Versamark Ink and embossed with gold embossing powder and then colored with Copic Markers. I added Rain Stones to the flowers and leaves.


I arranged the flowers on two layered circles die cut with the Love to Layer: Scalloped Circles Die, one of my go to die sets! The sentiments are included in the Stitched in Love Stamp Set. 

Here is how you can play along. To enter, participants are required to create a card with a little sparkle using PTI/Ink to Paper supplies. One winner will be chosen at random to receive a $25 gift certificate. Stop by the PTI Blog for all the details. 

Thanks for stopping by! Have a good weekend. 

7/20/21

It's Christmas in July!

Hello! It's Christmas in July! Today Taylored Expressions is releasing a new card kit, Merry Blooms! It's all about pretty Poinsettias! The kit is perfect for mass producing holiday cards or you can add all the layers! 


Here’s everything included the Merry Blooms Kit – which is available for $69:
Merry Blooms Stamp, Stencil, & Clear Combo set
Perfect Poinsettia die collection
Clearly Crafty Joyful Season stamp set
Bits & Pieces – Red Pearl & Gold Drip Drop Mix
6 A2 Envelopes: Sugar Cube, Toffee, Cherry Pop, Mulled Wine, Djion, and Cilantro
Packaged in a zippered pouch with a custom kit label
Limited quantity available. Most items not available to purchase individually.

You will be able to purchase additional envelope packs, envelope seals, the new Bits & Pieces – Red Pearl Drip Drops, and the Joyful Season die collection separately


I have three cards to share with you so lets get started! Using the Merry Blooms Stamp, Stencil, & Clear Combo set from the kit, I stamped the leaves and branches in Sweet Basil Ink on Toffee Cardstock. Then I stenciled the poinsettias in Sugar Cube Ink. I let the white pigment ink dry and then  I stamped the veins on the flowers with a stamp in the Clearly Crafty Joyful Season stamp set. I stamped in Sugar Cube Ink and embossed with TE White Embossing Powder.  


I stamped the sentiment in Versamark Ink on Cherry Pop Cardstock and embossed with TE Gold Embossing Powder. I die cut the sentiments on all my cards with the Joyful Season die collection. This die is not included in the kit but available for purchase separately. I used Gold Drip Drops on my project but the kit includes Bits & Pieces – Red Pearl & Gold Drip Drop Mix. The die cut flower is created with the Perfect Poinsettia die collection from the kit using vellum. 


I also created a coordinating tag. I like having lots of tags ready to go! The tags is die cut with the Pierced Tag Stacklets 2


Here is another take on the kit. First I cut a piece of Sugar Cube Cardstock to fit the card front and then lightly blended Salt Water Taffy Ink. I stamped the leaves and branches over the ink blending in Cilantro Ink. Next I die cut the poinsettias from Cherry Pop Cardstock and stamped the veins on the flowers in Versamark Ink and embossed with TE Gold Embossing Powder. 


The sentiment is popped up with foam tape. I finished off with Gold Drip Dots. I love how the envelopes and envelope seals from the kit look with the project! 


I created another coordinating tag. I used TE Glitter Cardstock in red for the flower. 


On my third card I went with a less tradition color theme using Sweet Basil, Cupcake, Guava, and Fruit Punch Inks. I blended Cupcake Ink on the background. I stenciled the flowers and then stamped the leaves and branches with the clear stamps. 


The card front is die cut with the Petite Scallop Rectangle Stacklets. I finished off the card by lightly splattering white paint and adding Bit & Pieces - White Rhinestone. 

Thanks for stopping by! I hope I have inspired you to start your holiday creating early this year! Stop by the TE Blog for all the details and more inspiration. 


7/15/21

Spellbinders July Clubs Blog Hop

Hi and welcome to the Spellbinders July Clubs Blog Hop. The hop will give lots of inspiration with a variety of the clubs that are available. You should have come to my blog from Betty Wright


Giveaway:

To celebrate this release, we are giving away a $50 gift certificate to 3 lucky blog readers – selected from the comments on our blog. Giveaway closes on Sunday, July 18th, 11:59 pm MST. The winner will be announced in this blog hop post the following Tuesday. The winner is responsible for shipping costs, duties, and taxes.

Please note, store credit (gift certificate) cannot be applied to Club Subscriptions. Store credit can be applied to shop past Club products, Club extras and regular releases.


My project today features the Spellbinders Large Die of the Month for July, Mini Slimline Envelope & Nested Card Creator. This a group of mini slim dies that nest together and includes the dies to create a envelope! 

You can see how the dies nest together. I love the different details on the edges of each dies. This really adds nice interest to the card. Behind the card you can see the envelope I created to coordinate with the card. First I die cut the nesting rectangles in different cardstocks, including the sentiment. One of the layers is cut from vellum to show the pattern underneath. 


Then I die cut the flowers and leaves with dies that are included in this month's die set. I layered them around the edges of the card and added yellow jewels to the centers of the flowers. 

Here is the list of all the participating designers. The next stop on the hop is Jenny Colacicco


Thanks for hopping along! 

7/14/21

Papertrey Ink July Sneak Peeks Day 4 - Topiary Times

Hi and welcome to Day 4 of the the Papertrey Ink July Release Sneak Peeks. Everything will be available for purchase beginning at 10 PM EDT on July 15th! Today I have two projects to share with you with the new Topiary Times Stamp Set


How about topiary air balloon!  The Topiary Time Stamp Set and Dies includes different sizes of topiaries, the air balloon, and a pot. This card used the larger topiary. 


In the background I stenciled clouds with Spring Rain Ink. I added a hill of grass and stamped a sentiment for the stamp set. The card is framed with the Border Bling: Skinny Heart Frames Die.


On my second card I used the smaller Topiary with the pot stamps. I stamped the pots in Enchanted Evening, Soft Stone, and Ocean Tides Ink. behind the plants I stamped the background with the Rustic Brick Background Stamp


The sentiment is from the Inside Greetings: Happy Hello Stamp Set. I framed the sentiment with the Border Bling: Skinny Stitched Frame Die. The woodgrain at the bottom is die cut with the Woodwork Die

Thanks for taking a look!  Stop by the Papertrey Blog for more more inspiration with the new products. You can start shopping at 10 PM EDT on July 15th!!


7/13/21

New Designer Dangles from Taylored Expressions

Today Taylored Expressions is releasing some new products in the Designer Dangles Collection. The Designer Dangles product line is a fun way to make your own earrings and are great for gift giving. 


My first set of earrings are created with the Knock On Wood - Wrap Around Earrings. I nested three wood circle together, die cut the Designer Dangles - Wrap Around Die from Custom Kraft Leather in Wild Child and Trendy Twigs. The die cuts a hole in the leather to attach the jump ring and then the earring wires


I used the Knock On Wood - On Point Frames and Leaves for these two sets of earrings. The Designer Dangles - On Point Die cuts a  backing for the On Point Frames. I used the Custom Leather - Blue Blossoms. The jump rings and earring wires come in silver and gold toned. 


This last pair uses the Designer Dangles - On Point Die again with the Designer Dangles - On Point Solids. 

Thanks for stopping by! Stop by the TE Blog for all the details on creating these earring and lots more inspiration!

Papertrey Ink July Sneak Peeks Day 3 - Birthday Wishes

Hi and welcome to Day 3 of the the Papertrey Ink July Release Sneak Peeks. Everything will be available for purchase beginning at 10 PM EDT on July 15th! Today I have two birthday cards to share with you. 


My first card features the new Mash-Up Birthday Stamp Set and Dies. This is a set of three birthday sentiments with one large word stamp and a coordinating sentiment that fits across the larger word. I stamped WISH in Versamark Ink on Sweet Blush Cardstock and embossed with Gold Embossing Powder. Then I stamped the smaller sentiment in Raspberry Fizz Ink. 


I stenciled clouds in the background with Aqua Mist Ink. The Balloons are created with the previously released Big Balloon Stamp Set and Dies. The sentiment on the balloon is stamped with the new Just Sentiments: Happy Hello Stamp Set. I stamped the sentiment on Vellum with Versamark Ink and embossed with Gold Embossing Powder. 


My next card is created with the new Cover Plate: Birthday Die. I always need more masculine birthday cards in my stash so I decided to go with a black, gold, and white color combo. I cut the cover plate from Stamper's Select White Cardstock, added a piece of True Black cardstock behind the die cuts and splatter the card front with gold ink. 


I cut the plate again from Gold cardstock and inlayed the gold die cut in the candle flames and over a few stars. The sentiment is from the Say It Essentials Stamp Set

Thanks for taking a look! I will be back tomorrow for Day 4 of sneak peeks. Stop by the Papertrey Blog for more more inspiration with the new products.


7/12/21

Welcome to Day 2 sneak peeks at the Ink to Paper July  Release Sneak Peeks.  Everything will be available for purchase beginning at 10 PM EDT on July 15th! Today I have some pretty floral themed projects to share with you. 


My first card features the new Floral Paradise Stamped Set and Dies and the Vase Collection 3 Die. I think these Birds of Paradise flowers are beautiful and I just love all the details. I stamped the vase in Spring Rain and Blueberry Sky Ink. 


In the background I scored every 1/4" and then add a strip of woodgrain with the Woodwork Die The sentiment is from the Say It Essentials Stamp Se


My second card is created with the Stitched In Love Stamp Set and Dies. I stamped the images in Versamark Ink and then embossed with White Embossing Powder. Then using a combination of inks, I used a blender brush to add the color to the flowers and leaves. 


The background is die cut with the Tin Border Bing: Tin Stitch Die and I blended Sweet Blush Ink over the white cardstock. The tag is die cut from Spring Moss Cardstock with the Tagged & Labeled Die. Behind the circle I die cut a circle with the Love to Layer: Scalloped Circle Die. The sentiment is included in the stamp set. 

Thanks for taking a look! I will be back tomorrow for Day 3 of sneak peeks. Stop by the Papertrey Blog for more more inspiration with the new products.


7/11/21

Ink to Paper July Sneak Peeks Day 1

Hi and welcome to Day 1 sneak peeks at the Ink to Paper July Release Sneak Peeks. July's release is full of pretty florals, an addition to the new Vase Collection, and new birthday products.  Everything will be available for purchase beginning at 10 PM EDT on July 15th!

I have a number of projects to share with you so let's get started! 


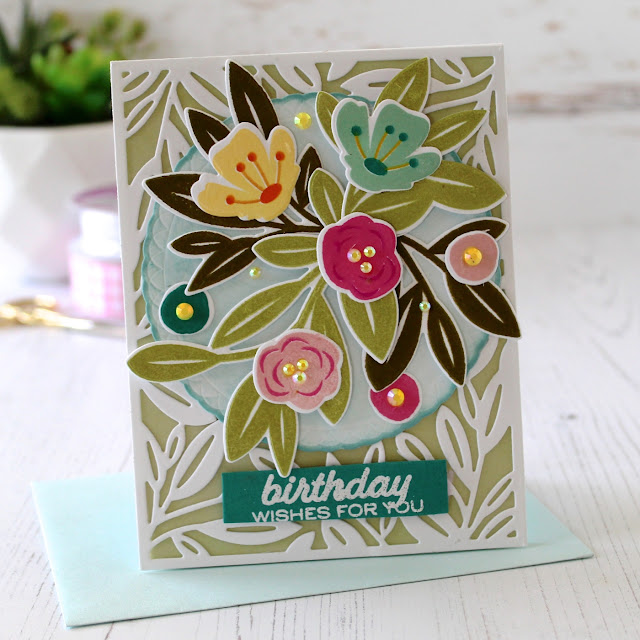
I have three projects to share with the new Prosperous Perennials Stamp Set and Dies. To create the background on my first card I die cut the Tin Border Bing: Tin Stitch Die from Stamper's Select White Cardstock, lightly blended Spring Rain Ink on the white background, and stamped the leaves from the new stamp set in Spring Rain Ink . 


I die cut circle hello sentiment from the new On the Border: Leaves Die from Blueberry Sky Cardstock and added a doily cut with the Delicate Doilies Die behind the sentiment. I added the flowers and leaves I stamped with the set around the circle and finished off with white jewels. 


The On the Border: Leaves Die comes with the border die I used on this card and the circle hello I used with the first card. I cut the border from Stampers Select White Cardstock and then added a layer of vellum and Spring Moss Cardstock behind the leaves. 


I arranged the flowers and leaves on a circle that I die cut with Love to Layer: Scalloped Circle Die. I cut the circle from white cardstock and blended Aqua Mist Ink. The sentiment is included in the stamp set. 


On my third card I used both of the dies in the On the Border: Leaves Die together. You can see how the circle fits perfectly inside the leaves. 


I cut the sentiment from white cardstock and inlayed it back into the circle. 


Next up is a look at the new Prosperous Leaves Background Stamp and the new Feathered Friends Mini 13 Stamp Set and Dies. I stamped the Prosperous Leaves Background Stamp on Stamper's Select White Cardstock in Versamark Ink and embossed with White Embossing Powder. Then I blended Aqua Mist Ink over the white embossing. 


I stamped the bird with the Feathered Friends Mini 13 Stamp Set. The branch is stamped with the previously released Feathered Friends Mini 8 Mini Stamp Set and the leaves from the new  Prosperous Perennials Stamp Set. Behind the bird I added a circle of vellum. The sentiment is included in the stamp set. 

Thanks for taking a look! I will be back tomorrow for Day 2 of sneak peeks. Stop by the Papertrey Blog for more more inspiration with the new products.


7/7/21

Spellbinders Large Die of the Month for July

I am popping in today with a project I created with the Spellbinders Large Die of the Month for July, Mini Slimline Envelope & Nested Card Creator. This a group of mini slim dies that nest together and the dies to create a envelope! 

Membership Includes:

Exclusive Larger Set of Versatile Dies that cut, emboss, deboss and stencil. Double the size of the Small Die Set! $40 Value!

Project Inspiration: Each kit will feature project ideas with at least one detailed how-to instruction tutorial each month.

Member Benefits & Savings: Receive exclusive member pricing in the Spellbinders store. Plus receive access to deals, savings, and gifts - only available to members. 


You can see here how the dies nest together. I love the different details on the edges of each dies. This really adds nice interest to the card. Behind the card you can see the envelope I created to coordinate with the card. 


First I die cut the nesting rectangle in different cardstocks, including the sentiment. The sentiment is cut from Spellbinders Mirror Gold Cardstock. This cardstock is really pretty in person. I can see using it throughout the holiday season. 


Then I die cut the flowers and leaves with dies that are included in this month's die set. I layered them around the edges of the card and added gold jewels to the centers of the flowers. 


Thanks for visiting my blog! You can find all the Spellbinder Clubs here