Showing posts with label Florals. Show all posts

7/20/25

Papertrey Ink July Release Countdown Day 3

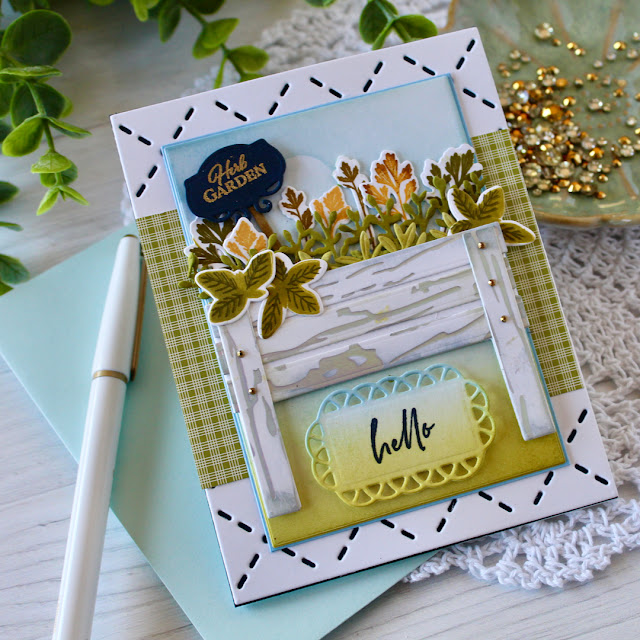
Welcome to Day 3 of the Papertrey Ink July Release Countdown. Today I have two more projects to share with you. All the new products will be available on July 22nd at 12 PM EDT. 


This pretty stamp set is called In Full Bloom and of course, there are coordinating dies. I like the fun, whimsical style of this set. I have listed the ink colors I used below. I also added a little light coloring to the leaves with Olo Markers.


I used the Love to Layer: Arches Dies to create the arched frame. I die cut white cardstock and ink blended the grass and clouds. 


I used the Ornate Swirls Hot Foil Plate to create the background, foiling with gold foil. 

Supplies:

Stamps: In Full Bloom
Dies: In Full Bloom, Love to Layer: Arches Die
Ink: Aqua Mist, Simple Chartreuse, Ripe Avocado
Paper: Stamper's Select White, Ripe Avocado, Lilac Grace
Other: Ornate Swirls Hot Foil Plate, Gold Foil, Various purple inks, cloud stencil, foam tape


My next card is created with the Reflections: Philippians 4 Stamp Set and Dies and the new Cornered: In Full Bloom Dies. 


I stamped the verse on True Black Cardstock, embossed with gold embossing powder, die cut the sentiment and then added the sentiment to background die cut that is part of the Reflections: Philippians 4 Dies. 


The background is stenciled with the Perfect Present Stencil Collection with Lemon Tart Ink. I die cut the corners with the Cornered: In Full Bloom Dies. Then I used the die again with colored cardstock and inlayed the pieces back into the card. 

Supplies:
Stamps: Reflections: Philippians 4
Dies: Reflections: Philippians 4, Cornered: In Full Bloom
Ink: Lemon Tart, Sweet Blush, Hibiscus Burst, Green Parakeet,Versamark
Paper: Stamper's Select White, Green Parakeet, Sweet Blush, True Black, Gold
Other: Gold Embossing Powder, Gold Gems, Perfect Present Stencil Collection

Thanks for stopping by! I be back tomorrow with more projects from the July Release. Stop by the PTI Blog for more details and inspiration from the team.

7/18/25

Papertrey Ink July Release Countdown Day 1

 Welcome to Day 1 of the Papertrey Ink July Release Countdown. This month is full of pretty floral, gardens, and large, focal point sentiments. All the new products will be available on July 22nd at 12 PM EDT. 


My first two cards feature the new Into the Blooms: Above Ground along with the This is Big Sentiments: Wishes. The Into the Blooms: Above Ground Dies creates this pretty wooden bucket along with the flowers and greenery. I just die cut from colored cardstock and added a little ink blending to highlight the details. 


To created the background I used the new Rustic Woodgrain Hot Foil Plate with Champagne Foil on Vellum. 


The larger and smaller sentiments are added with the This is Big Sentiments: Wishes Stamp Set and coordinating Dies: 

Supplies:

Stamps: This is Big Sentiments: Wishes
Dies: This is Big Sentiments: Wishes, Into the Blooms: Above Ground
Ink: Classic Kraft, Hibiscus Burst, Ocean Tides, Pine Feather, True Black
Paper: Stamper's Select White, Classic Kraft, Sweet Blush, Ocean Tides, Mint Julep, Pinefeather, Lemon Tart, Aqua Mist, Vellum, Gold Cardstock
Other: Rustic Woodgrain Hot Foil Plate, Champagne Foil, Black Gems, Foam Tape


Here is my second card with the Into the Blooms: Above Ground Dies. I created a white bucket and used Silver Cardstock for the metal bands. 


The background is die cut with the new Cover Plate: Honeycomb from Bitty Big Collection: True Black Cardstock.  I blended Lemon Tart Ink on white cardstock and add it behind the die cuts. The small bees I added are die cut with the previously released Into the Blooms: Wild Wood Die. 


This is another sentiment from the This is Big Sentiments: Wishes. 

Supplies:

Stamps: This is Big Sentiments: Wishes
Dies: Into the Blooms: Above Ground, Cover Plate: Honeycomb, Into the Blooms: Wild Wood
Ink: True Black, Summer Sunrise, Winter Wisteria, Hibiscus Burst, Raspberry Fizz, New Leaf, Aqua Mist
Paper: Stamper's Select White, Lemon Tart, Plum Pudding, Sweet Blush, Raspberry Fizz, True Black, New Leaf, Pinefeather, Green Parakeet, Bitty Big Collection: True Black, Vellum
Other: Silver Cardstock, Black Gems, Foam Tape


Next up is a look at the new Above Ground Stamp Set and Above Ground Dies. This is a fun set. You can create a herb garden or a vegetable garden and there is a three D option for the wood box. 


I used the Rustic Woodgrain Hot Foil Plate to foil white cardstock with a silver foil and then die cut the wooden box pieces. Then I filled the box with stamped and die cut herbs. 


The card front is die cut with the Cover Plate: Cross Stitch from white cardstock with Blue Corn Cardstock behind the die cuts. The sentiment is from the Say It Essentials Stamp Set. 

Supplies:

Stamps: Above Ground, Say It Essentials
Dies: Above Ground, Cover Plate: Cross Stitch, Love to Layer: Laced Edges
Ink: Spring Moss, Simply Chartreuse, Ripe Avocado, Spring Rain, Olive, Harvest Gold, Honey Nut, Versamark
Paper: Stamper's Simply Select White, Dark Indigo, Bitty Big Collection: Simple Chartreuse
Other: Rustic Woodgrain Hot Foil Plate, Silver Foil, Gold Embossing Powder, Gold Gems, Cloud Stencil

Thanks for stopping by! I be hack tomorrow with more projects from the July Release. Stop by the PTI Blog for more details and inspiration from the team. 

6/4/25

Thinking of You

Hi! I am popping in today with a card I created for Spellbinders with the Begonia and Ladybugs Etched Dies are from the Summer Solstice Garden Collection by Susan Tierney-Cockburn.


There a number of pretty flowers in the Summer Solstice Garden Collection. I used the Begonia and Ladybugs Etched Dies for my card. I die cut the flowers and leaves from white cardstock and blended  with Distress Inks and the glued the layers together added gems to the center of the photos. 


The sentiments are from the Summer Solstice Garden Sentiments BetterPress Plate & Die Set. I used a black foil. Then I added the two lady bugs. 


The background is embossed with the Flowers & Foliage 3D Embossing Folder. I die cut the center panel with the Nested Postage Labels & Tag Etched Dies. 


Thanks for stopping by!

5/26/25

Papertrey Ink May Release Countdown Day 4

Welcome to the 4th and final day of the Papertrey Ink May Release. I have two more projects to share with you.  All the new products will be available tomorrow, May 27th at 12pm EDT. 


My first card features the adorable new Build-A-Buggy Die Set and This is Big Sentiments: Baby Stamp Set and coordinating dies. There are so many options in the die set to create different types of buggies and the coordinating Build-A-Stencils allow you to add pattern. You can see how I stenciled the Swiss dots on the top of the buggy. 


I love the addition of the clouds in the set. I used a gold foil cardstock for a touch of bling. I attached the buggy to an oval that is die cut with the Love to Layer: Scalloped Ovals. I used Stamper Select White Cardstock that is ink blended with Sweet Blush Ink. 


The sentiments are from the new This is Big Sentiments: Baby and die cut with the coordinating dies. I used the Cover Plate: Tin Stitches to add the texture to the card front. 

Supplies:

Stamps: This is Big Sentiments: Baby
Dies: This is Big Sentiments: Baby, Build-A-Buggy, Love to Layer: Scalloped Ovals, 
Cover Plate: Tin Stitches
Ink: Sweet Blush, Lemon Tart, True Black
Paper: Stamper's Select White, True Black, Sweet Blush, Gold
Other: Build-A-Buggy Stencils, Black Gems, Cloud Stencil


Next up is a look at the Into the Blooms: Lemon Blossoms Dies. I love the details on the lemons. I die cut the lemons from white cardstock and then blending Lemon Tart and Summer Sunrise Inks. The leaves are blended with New Leaf and Pinefeather and I added a little Aqua Mist Ink to the white flowers. 


I arranged the leaves on a rectangle that is die cut with the Love to Layer: Deckled Edges dies. I stenciled the background with a cloud stencil and Aqua Mist Ink and then splattered an aqua watercolor on the background. 


The card front is stenciled with the new Life's Lemons Stencil. The sentiment is from the new Main Squeeze Stamp Set. 

Supplies:

Stamps: Main Squeeze
Dies: Into the Blooms: Lemon Blossoms, Love to Layer: Deckled Edges
Ink: Lemon Tart, Summer Sunrise, Aqua Mist, New Leaf, Pinefeather, True Black
Paper: Stamper's Select White, New Leaf
Other: Life's Lemons Stencil, Diamond Stickles, Clear Gems, Blender Brushes

Thanks for stopping by! Stop by the PTI Blog for all the details and more inspiration from the team. 

5/13/25

A Year In Bloom

As a token of gratitude for shopping with Taylored Expressions, every order you place comes with a free gift. For 2025, we’re excited to bring you A Year in Bloom - a series of monthly red rubber stamps inspired by birth flowers. With today's release we are excited to have some fun additions to go along with the rest of the A Year in Bloom collection. 


My first card is created with the new A Year in Bloom - Vases and Places 2 Die Set, the Petite Scallop Gallery Builder, and the Large Lattice Layering Stencil and Large Lattice Stamp. I used the Year in Blooms stamps from January, February, March, April, and May along with the coordinating dies. 

If you miss a month you can buy the stamp to keep your collection complete. 


I colored the flowers with Olo Markers, die cut them, and arranged them in the four fun vases I die cut with the A Year in Bloom - Vases and Places 2 Die. The sentiments are from the previously release Mini Strips - Floral Stamp set. 


The background is stamped with the new Large Lattice Stamp and stenciled with the Large Lattice Layering Stencil using Macaron Ink. Next I die cut scalloped shapes to center the floral arrangements on with the new Petite Scallop Gallery Build Die set. I cut them from Sugar Cube Cardstock lightly blended ink to add the pastel colors. 

Next up is a closer look at the Large Lattice Stamp and the Large Lattice Layering Stencil. Here I stamped the  Large Lattice Stamp on Sugar Cube Cardstock in Blue Corn Ink. Then I stenciled with the Large Lattice Layering Stencil. There are three stencils in the set. I used Granny Smith, Banana Cream, and Bleu Cheese Inks. Then I splattered with Dr. Ph. Martin's bleed proof white opaque watercolor. 


I die cut these vases with the previously released A Year in Bloom - Vases & Places Die Set. My flowers are colored with Copic Markers and I added Tiny Diamonds to accent the vases. 

I used the new Diamond Stacklets Die set to cut three diamonds that fit the diamonds that are stamped with the Large Lattice Stamp and used foam tape to pop them up from the background. 


This sentiment is from the Sundry Sentiments Die Set and die cut with the coordinating Sundry Sentiments Dies. 

From new focal points to backgrounds, A Year in Bloom Beyond is all about helping you do more with the flowers you already have.

Save $10 on the A Year in Bloom Beyond Bundle! Offer valid 5/13 at 9 am CT through 5/20 at 9 am CT or while supplies last.


Thanks for stopping by! Stop by the TE Blog of all the details and more inspiration from the team. 

5/12/25

Take Note

Hi All! I am kicking off the week with cards I created with the new Take Note Collections from Spellbinders


I have three cards to share with you with a mix of the new products that you will find linked below. 


My first card is centered around the new Reel Color Etched Dies. I think this die is so fun and different from anything else I own. I dic cut the wheel from white cardstock  and then added the different colored cardstock in the imprinted stop on the wheel. 


The Reel Color Sentiments BetterPress Plate & Die Set has the perfect sentiments to go with the collection. I love that the BetterPress Plates can be used with the BetterPress System or the Glimmer Hot Foil System. Here I foiled the sentiment with gold foil on Raven Cardstock. 


I used the Take Note Registration BetterPress Plates with Mooniest Foil to created the striped background. The flower is die cut with the Floral Spray Etched Dies.


I used the Reel Color Etched Dies on my second card too and added another sentiment from the Reel Color Sentiments BetterPress Plate & Die Set.


I used the Take Note Registration BetterPress Plates with black ink for the background and the sentiment at the top of the lined paper. I used gold foil for the gold line down the side. I used the Torn Paper Edges Etched Dies to die cut the torn edges of the notebook paper. 


The Wish sentiment is from the previously release Fresh Picked Sentiments Etched Dies. I finished off the card with different color enamel dots. 


My final project features the Push Pin Notes Etched Dies which creates the notebook paper with the turned up paper edge and the cute pushpins. 


For the background I created another sheet of notebook paper with the Take Note Registration BetterPress Plate and used the Torn Paper Edges Etched Dies to add details to each side of the notebook paper. 


I used the Floral Spray Etched Dies to add the flowers and leaves. 

Thanks for stopping by! You can find all the new products HERE

12/27/24

Papertrey Ink December Release Peeks Day 1

Hi Everyone! I hope you had wonderful Holiday and are ready to celebrate the start of a New Year! Today is Day 1 of the Papertrey Ink December Release Countdown. December's Release is all about Love, Get Well, and beautiful florals. All the new products will be available on December 31st at 12 PM ET. 


My first project features the Garden Grace Stamps and Dies and the new Love to Layer: Laced Edges. I like the modern, fun floral images. I used a mix of Sweet Blush, Hibiscus Burst, Lemon Tart, Orange Zest, Simply Chartreuse, New Leaf, and Raspberry Fizz Inks to stamp the images. 


I die cut the largest die in the new Love to Layer: Laced Edges from Stamper's Select White Cardstock. Then starting at the bottom I blended New Leaf, Sweet Blush, and Lemon Tart Ink. I stamped a sentiment from the Garden Grace Stamp Set in Versamark Ink on a strip of Vellum and embossed with Black Embossing Powder. 


The background is stenciled with the Simple Stitch Crochet Stencil Collection and Sweet Blush Ink. 

Supplies:

Stamps: Garden Grace
Dies: Garden Grace, Love to Layer: Laced Edges
Ink: Sweet Blush, Hibiscus Burst, Lemon Tart, Orange Zest, Simply Chartreuse, New Leaf, Raspberry Fizz, Versamark
Paper: Stamper's Select White, Vellum
Other: Simple Stitch Crochet Stencil Collection, Black Embossing Powder, Clear Gems, Blender Brushes, Foam Tape


Next up is look at the Get Well Soon Stamps and Dies and the Perfectly Coiled Rectangle Hot Foil Plate. I stamped the images with a mix of Aqua Mist, Enchanted Evening, Sweet Blush, Mint Julep, New Leaf, Hibiscus Burst, and Lemon Tart Inks and the die cut with the Get Well Soon Dies.

To create the background I used the new Perfectly Coiled Rectangle Hot Foil Plate with Spellbinders Blue Foil. I die cut a rectangle from masking paper and the blended Lemon Tart Ink in the center. 


I finished off the card with gold gems. 

Supplies:

Stamps: Get Well Soon
Dies: Get Well Soon
Ink: Aqua Mist, Enchanted Evening, Sweet Blush, Mint Julep, New Leaf, Hibiscus Burst, Lemon Tart, Versamark
Paper: Stamper's Select White, Enchanted Evening, Bitty Big Collection: Aqua Mist
Other: Perfectly Coiled Rectangle Hot Foil Plate, Gold Embossing Powder, Gold Gems, Gold Glittered Cardstock, Blue Foil

Thanks for much for stopping by! Stop by the PTI Blog for more inspiration from the team. I will be back tomorrow with more projects from the December Release.