4/27/21

New Teacher and Graduation Release from Taylored Expressions

Hi Everyone! Today Taylored Expressions is releasing new Graduation and Teacher products,  including over 20 new products; stamps, dies, stencils, new Bits & Pieces embellishments, and the new Simple Storage for Building Blocks case!


Get the Hooray Bundle for 15% off the retail price! The bundle includes:

On the Block – Hooray stamp

On the Block – Hooray Shadow die

Congrats die

Building Blocks – Well Done stamp

Simple Storage for Building Blocks case

The special introductory price of the Hooray Bundle is available Tuesday, April 27th, through Sunday, May 2nd, or while supplies last!


It has been quite a year and I know we want to honor our teachers and grads!!! First I have two card I created with the new Full Circle - School Stamp Set and the Grad Cap Layering Stencil. The Full Circle - School can be used for either teachers or graduates. 

On my first card I stamped in Versamark Ink and embossed with TE Gold Embossing Powder. I cut a piece of Sugar Cube Cardstock to fit the card front and cut a circle directly into the card front with the Stitched Circle Stacklets. Then I added the stamp image behind the circle. 


On this card I used just one of the stencils in the new Grad Cap Layering Stencil.  I stenciled the stars with Versamark Ink and the embossed with TE Gold Embossing Powder. The sentiments are from the the new Mini Strips - Grad

The graduation hat is created with the previously released The Tassel and the Tassel Die


I created the second card in basically the manner, except here I die the the Full Circle-School Stamp with the Stitched Circle Stacklets and matted with the Petite Scallop Circle Stacklets. 


I also used all three layers of the stencil on this card. 


Next up is a look at the new Fill in the Blank - Teacher and the I Pick You Cling and Clear Combo. I die cut a piece of Salt Water Taffy Cardstock with the Stitched Mini Slim Stacklets and matted with Sugar Cube Cardstock die cut with the Petite Scallop Mini Slim Stacklets. In the background I stamped the I Pick You Cling Stamp. 


I stamped two of the sentiments from the Fill in the Blank - Teacher Cling and Clear Combo in Cherry Pop Ink and added the two apples with the I Pick You Cling and Clear Combo and the I Pick You Die. The bottom sentiment is included in the  Fill in the Blank - Teacher Cling and Clear Combo. 


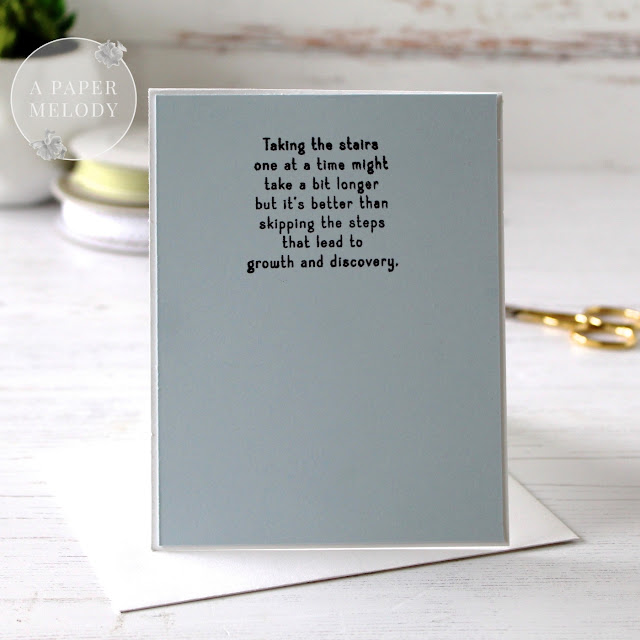
On the inside I stamped a sentiment from the new Inside Scoop - Teacher Stamp Set

Thanks for stopping by! Stop by the TE Blog of all the details and more inspiration with the new products. 


4/26/21

Share Your HeArt: Basket of Blossoms Kit

Yesterday I gave you a sneak peek at the new Share Your HeArt: Basket of Blossoms Kit from Ink to Paper. Today I have two more cards I created with the new kit to share with you. You can stop by the PaperTrey Ink Blog for all the details on the kit. You can find the new kit HERE

The Share Your HeArt series is very special because it allows each and every one of us to give back to our community in a vital way. The name Share Your HeArt was carefully chosen…  Sharing your heart with others by generously donating to very important causes and then we hope you will share your He”Art” with others through the gorgeous works of art you will create with these beautiful products.  When you purchase a Share Your HeArt kit you will be giving to a carefully chosen charity that in turn will support those in need that benefit from that charity’s “soul” purpose.  We are so grateful to have organizations that work tirelessly for those that need help in our community and we hope that you will support us in supporting them.


To create this card I used to two of the patterned papers in the kit, one for the background and one for the frame that I cut with the Border Bling: Skinny Diagonals Frame Die. Next I cut a circle of Stamper's Select White Cardstock with the Love to Layer: Scalloped Circle Die.  I used Spring Moss and Lilac Grace Ink and a color stencil to create the background on the circle. 


Here is I closer look at the stamps in Basket of Blossoms Stamp Set. I stamped the basket on Classic Kraft Cardstock with Versamark Ink and embossed with white embossing powder. I used Copic Markers to color the seed packets. 


Although you can stamp all the flowers and leaves, on my second card I decided to color with Copic Markers. Sometimes I just get in the mood to color! I cut the basket for Stamper's Select White Cardstock and blended ink on the basket. 


I used another piece of patterned paper from the kit for the card from and die cut with the Border Bing: Tin Stitch Die. I really like the details on the stamps and dies in this set. 

Thanks for stopping by! You can find the Share Your HeArt: Basket of Blossoms Kit HERE. 


4/25/21

New Card Kit from Ink to Paper

Today I am giving you a sneak peek at a new card kit being released from Ink to Paper. The Share Your Heart Kit, Basket of Blossoms, will be available for purchase tomorrow.  The kit includes pretty papers and a great stamp set and coordinating dies. All the proceeds from the sale of these kits will be Donated to the Elizabeth Smart Foundation. The Foundation brings hope and ending the victimaztion and exploitation of sexual assault through prevention, recovery, and advocacy. 

Here is my first card to share. I stamped one of the baskets from the kit on Classic Kraft Cardstock and stamped in Classic Kraft Ink. I love the detail on the basket created by both the stamp and the die. 


I filled the basket with flowers and foliage from the Basket of Blossoms Stamp Set and added a bow. The sentiment is also from the stamp set. 


The patterned papers are included in the Kit. I added a piece of lace across the center of the card and framed the card front with the Border Bling: Skinny Postage Frame Die. I also added a few white rhinestones. 

Thanks for stopping by! I will be back tomorrow with another project from the kit. 


4/20/21

New Black & White and Bitty Blenders from Taylored Expressions!!

I am so excited to share the new Black and White Blenders Brushes and the new Bitty Blenders from Taylored Expressions with you today! The original TE Blender Brushes were a game changer for me with the colored coded handles. Now the brushes come in Black and White! 

The new Bitty Blender Brushes  smaller heads allow you to more easily use multiple colors of ink on intricate stencil patterns. Bitty Brushes are sold in a set of 6 with vinyl stickers for labeling the brush handles, sold separately. In addition to the blender brushes, we're releasing several stencils that will work perfectly using multiple colors of ink with the Bitty Blender Brushes. 


I have two cards to share with you showcasing how I used the new brushes. 


My first card is created with the new Dahlia Stencil and the Bitty Brushes. I cut a piece of Sugar Cube Cardstock to fit the card front. I secured the stencil to the card stock with purple tape and then blended my inks, starting in the middle of the stencil with Mint Julep Ink, then Confetti Cake to Blue Raspberry to Blueberry. 


At the top of the card I added two of my favorite sentiments from the Simple Strips - Thanks Stamp Set, stamping in Versamark Ink and embossing with TE Gold Embossing Powder. The flowers are stamped and die cut with the Picked Posies stamps and dies. I colored with Copic Markers and finished off the card with the a few Bits & Pieces - Gold Drip Dots. 


On my second card I used the new TE White Blender Brush, one of the Bitty Blender Brushes and the new Delightful Daisy Stencil. I used Sugar Cube Ink for the flowers and Lemon Meringue Ink for the centers of the flowers. I die cut the card front with the Stitched Rectangle Stacklets and matted with the Petite Scalloped Rectangle Stacklets. 


The die cut daisy is created with the Layer It - Daisy Die. The sentiment is from the Simple Strips Background Stamp, die cut with the Simple Strips Die, and backed with the Simple Strips Backer Die. 


Details on the bundle:

The I Want it ALL Bundle retails for $75 and includes the following:

  • Bitty Blender Brushes (set of 6)
  • Bitty Blender Brush labels
  • Black & White Blender Brushes (set of 2)
  • All 6 new stencils
  • 8.5″ x 11″ Grid Paper Placemat Pad

The special introductory price of $75 on the I Want it ALL Bundle is available now through Sunday, April 25th, or while supplies last!


Stop by the TE Blog for all the details and more inspiration. 

4/14/21

Ink to Paper April Release Sneak Peeks Day 4

Hi Everyone! Today is the final day of the Ink to Paper April Release Sneak Peeks. I have two more cards to share with you. Everything will be available for purchase beginning at 10 PM EDT tomorrow,  April 15th! 


My first card features just one of the beautiful sentiments in the new Mother & Father Stamp Set. I stamped the sentiment in Enchanted Evening Ink and die cut with the Love to Layer: Scalloped Circle Die and matted with the Delicate Doilies Dies


The bird is created with the new Feathered Friends 10 Dies. I cut the bird from white Cardstock and blended Lemon Tart, Hawaiian Shores, Tropical Teal, Enchanted Evening Inks. The flowers are stamped with the new Blooming Thoughts Stamp Set and Dies. The card front is die cut with the previously released Border Bling: Dainty Deliveries Frame Die. 


My next card features the pretty blooms from the new Blooming Thoughts Stamp Set and Dies along with one of the sentiments included in the set. I placed the flowers in a pitcher stamped with the previously released Abundant Blooms Stamp Set and Dies


The background is stamped with the Nifty Plaid Stamp Set in Versamark Ink on Stamper's Select White Cardstock. Then I used a blending brush to add Lemon Tart Ink. 

Thanks for taking a look!  Stop by the Papertrey Blog for more more inspiration with the new products.  Everything will be available for purchase beginning at 10 PM EDT tomorrow.

4/13/21

New Butterfly Wishes Card Kit from Taylored Expressions

 Hi! Today a have a fun new Card Kit from Taylored Expressions to share with you! It is available NOW in TE Store! 


Here’s everything included the Butterfly Wishes Kit– which retails for $55:
Butterflies Stamp & Stencil Combo set
Butterflies die collection
Clearly Crafty Butterfly Wishes stamp set
Clearly Crafty Sweet Sentiments stamp set
Diamond Jewels
6 Custom Envelope Seals
6 Toffee A2 Envelopes
Packaged in a zippered pouch with a custom kit label
Limited quantity available. Most items not available to purchase individually.

I have two cards to share that I created with the new kit. 


On my first card I created the background with the Butterflies Stamp & Stencil Combo set. I used the stamp and Oreo Ink to stamp the body of each butterfly and used the stencil and my TE Blender Brushes to stencil the butterflies on the card front. 


I cut a circle from Salt Water Taffy Cardstock with the Stitched Circle Stacklets and stamped one of the sentiments included in the kit. I die cut three extra butterflies with the Butterflies die collection and popped them up with foam squared. I finished off with a few Diamond Jewels included in the kit. 


I created a mini slim line card for my second example. I used the perviously released Mini Slim Stencil - Sunday and Potato Chip and Pineapple Ink for the card background. These butterflies are stamped with the Clearly Crafty Butterfly Wishes stamp set and die cut with the Butterflies die collection. 


I stamped a swirl for each butterfly and the attached each butterfly with foam tape. The sentiment is included in the kit. How how cute are the coordinating butterfly seals! 

Thanks for stopping by! Stop by the TE Blog for all the kit details and more inspiration from the Design Team. 


Ink to Paper April Sneak Peeks Day 3

I am back for Day 3 of the Ink to Paper April Release Sneak Peeks. Today I have two more cards to share with you using to new products for creating scenes. Everything will be available for purchase beginning at 10 PM EDT on April 15th!


My first card focuses on the new Where It Leads Stamp Set and Dies. This whole scene was built with the new stamps and dies. I starting by stamping the stairs, first the outline and then the next three stamps to add the details and dimension. At the bottom of the card I blended Simply Chartreuse Ink and at the top of stairs I stenciled clouds with Aqua Mist Ink. 


The sentiment is from the new Just Sentiments: Steps. I framed the scene with the largest die in the Border Bling: Skinny Diagonals Frame Die. I added a few jewels to the flower stems. 


My second card is created with the new Cover Plate: Scenic Path. I die cut the cover plate twice from Stamper's Select White Cardstock. On the first die cut I just added a little color by blending Spring Moss Ink. Using pieces of the second die cut I added the bushes and path. The gate is from the Where It Leads Stamp Set and dies. I stamped the gate in Versamark Ink and embossed with gold embossing powder. 


This sentiment is also from the Just Sentiments: Steps. I stamped the sentiment on Spring Rain Cardstock and added a circle of vellum behind the sentiment with the Love to Layer: Scalloped Circle Die


Inside I added a sentiment from the new Inside Greeting: Steps

Thanks for taking a look! I will be back tomorrow for Day 4 of sneak peeks. Stop by the Papertrey Blog for more more inspiration with the new products.

4/12/21

Ink to Paper April Sneak Peeks Day 2

I am back for Day 2 of the Ink to Paper April Release Sneak Peeks. Today I have some  have two Father's Day projects to share with you. Everything will be available for purchase beginning at 10 PM EDT on April 15th.


My card showcases the new Mug Die and To Die For Sentiments: 24 x 7 Dad Die. I die cut the mug from Dark Indigo Cardstock. Next I die cut the To Die For Sentiments: 24 x 7 Dad Die directly into the middle of the Mug. I cut the sentiment again from a gold foil and inlaid the numbers into the front of the mug. 


The bottom sentiment is from the new Dad's Time Stamp Set. I stamped in Versamark Ink and embossed with gold embossing powder. I mounted the mug on white Cardstock die cut with the Love to Layer: Notched Die. The patterned paper is from the Bitty Big: Ocean Tides Color Collection.


My second card is created with the Dad's Time Stamp Set and Dies. I stamped the ties in True Black Ink and the add some blue to a couple of the ties with Copic Markers. I die the ties and added them a tag die cut with the Tagged & Labeled Die


The top sentiment is included in the Dad's Time Stamp Set. The bottom sentiment is included in the new Inside Greetings: Thanks Dad. The patterned paper is from the Bitty Big: Spring Rain Color Collection.

Thanks for taking a look! I will be back tomorrow for Day 3 of sneak peeks. Stop by the Papertrey Blog for more more inspiration with the new products.

4/11/21

Ink to Paper April Release Sneak Peeks Day 1

Hi Everyone! Thanks for stopping by! Today is Day 1 of the Ink to Paper April Release Sneak Peeks. Aprils's Release is is all about the men in our lives and pretty scene building options. . Everything will be available for purchase beginning at 10 PM EDT on April 15th!


My first three project are created with the new Sea of Life Stamp Set and Dies and the new Weaved Background Stamp. I cut a circle from Stamper's Select White Cardstock with the Love to Layer: Scalloped Circle Die. I stamped the water at the bottom of the circle, and added white gel pen to add a few highlights to the the waves. I stenciled clouds with Spring Rain Ink and then stamped two sea gulls and then die cut sun. 


I stamped the Weaved Background Stamp on Classic Kraft Cardstock and embossed with white embossing powder. Then sentiment is included in the stamp set. 


On my second card I started by creating the background. I stamped the water in Tropical Teal and Dark Indigo Ink. Then I blended Lemon Tart, Bright Buttercup, Orange Zest to create the sunset sky. I die cut a mask with the sun die from the die set to blend the evening sun. 


I stamped one of the sentiments in stamp set with Dark Indigo Ink. The frame is stamped with the Weaved Background Stamp and die cut with the Skinny Stitched Frame Die. 


On my third card I chose another sentiment from the stamp set and the anchor as the focal points. I stamped the anchor in Smokey Shadow Ink and the added the detail with WOW Mermaid Tails Embossing Powder. 


I stamped the background with Smokey Shadow Ink on Aqua Mist Cardstock. 


My final card focuses on the new Feathered Friends Mini 10 Stamp Set and Dies. I stamped and die cut the branches with the previously released Brighter Days Stamp Set and Dies. The frame is die cut with the Border Bling: Skinny Heart Frames Die


I used the Cover Plate: Ornate Die and Spring Rain Cardstock to created the card front. 

Thanks for taking a look! I will be back tomorrow for Day 2 of sneak peeks. Stop by the Papertrey Blog for more more inspiration with the new products.