5/31/21

Sending You Sunshine

Hi! I am up on the Papertrey Ink Blog today with the project I created for the new feature, What do I do with this? Challenge. For this challenge PTI designers will get to try out some  new tools and share the projects they created using them.  This month we are working with the Nuvo Blender Brushes.

You can play along! One winner will be chosen at random to receive a $25 gift certificate. To enter, participants are required to create a card using a stencil to blend the background using PTI/Ink to Paper supplies. Stop by the PTI Blog for all the details. 


Nuvo Dual Tipped Blender Brush work great with stencils and are perfect for building a background scene. I used a Sunray Stencil with Lemon Tart and Summer Sunrise ink to stencil the sun rays and at the bottom of the card I used blended Blueberry Sky and Enchanted Evening Ink to add the water. (See products links below)


I also blended Lemon Tart and Summer Sunrise on a circle of white cardstock to create the sun.  Blending brushes also allow you to add a little color in select places. At the bottom of the clouds I lightly brushed on Spring Rain Ink and at the bottom of the clouds and Soft Stone Ink at the bottom of the sea gulls. The little touch of ink make the die cut images stand out against the background. 


The sailboat is created with the Seas of Life Stamp Set and Dies. I used foam tape to attach the boat to add dimensions to the card. The sentiment if from the new Just Sentiments: Summer Mini Stamp Set. 

Stop by the PTI Blog for more inspiration and how you can enter the challenge. 


5/24/21

Life is an Adventure

I am starting off the week with a summer card created with products from the newest Pretty Pink Posh Release. Last week I spent a few days in Santa Barbara, our first getaway in a really long time. So sun, ocean, and sailboats inspired my card today. 

My card is created with the Nautical Stamp Set and the Coordinating Nautical Dies. (See links below) I knew I wanted to create a scene so I cut a piece of white Cardstock for the card front. I blended yellow ink about half way down the card front and then added hill with Kraft Cardstock and a die from the Stitched Borders 1 Dies. 

I cut two borders of waves with the dies in the Nautical Stamp Set. The waves are stamped in Versamark Ink and embossed with white embossing powder. I blended Distress Inks in Stormy Sky and Blueprint Sketch and the splattered white paint to create the look of water. I frame the scene with a die from the Nature Essentials Dies. 


The stamped images are colored with Copic Markers and the sentiment is included in the Nautical Stamp Set. I finished off the card with a few Sparkling Clear Jewel. 

Thanks for taking a look! 


5/18/21

Interactive card designs with Taylored Expressions

 Today Taylored Expressions is releasing some new products to create interactive card designs. You can also incorporate a number of the products with your traditional card making. I have three cards to share with you today to give you an idea of how the products work together. 


My first card uses the new Theater Fold Frame Die. First I stamped the Confetti Background Stamp on Salt Water Taffy Cardstock in Lollipop, Lime Zest, Lemon Meringue, and Cookie Monster Ink. Then I used the die to cut the frame and the window. There will be videos on the TE Blog to give you instructions on putting the card together. 


This is how the card looks when it will pulled open. You can purchase the Theater Fold Flaps that are pre-scored for you in Sugar Cube and Toffee Cardstock. 


On the inside of the card I added the candles and sentiment from the new Oh My Word-Happy Birthday. 


Here is another Theater Fold Card using the new Oh My Word-Thank You Stamp Set and Die. I stamped the thank you sentiment on Fruit Punch Cardstock, with Versamark Ink and embossed with TE White Embossing Powder. The frame is stenciled with the previously released Best Buds Stamp and Stencil Combo. 


On the inside to the card I stamped, colored, and die cut flowers and leaves with the Full of Flowers- Singles Stamp Set and Dies. 


The sentiment is included in the Oh My Word-Thank You Stamp Set. 


On my final project I used the new Oh My Word - Hello Stamp Set and Dies, creating a traditional A2 Card. I stamped Hello in Versamark Ink on Blue Raspberry Cardstock and embossed with TE White Embossing Powder. I stamped the cute phones in Oreo Ink and colored with Copic Markers. 

The circle is die cut with the Stitched Circle Stacklets and matted with the Petite Scallop Circle Stacklets. 


I created the background by stamping the phone stamp on the diagonal with Mint Julep Ink on Mint Julep Cardstock. At the bottom I stamped a sentiment from the the Oh My Word - Hello Stamp Set. 

Be sure to stop by the  TE Blog for all the details, more inspiration, and more detailed instruction on creating the interactive card. 

5/14/21

Ink to Paper May Release Sneak Peeks Day 4

Thanks for stopping by! It is the final day of sneak peeks of the Ink to Paper May Release. Everything will be available for purchase beginning at 10 PM EDT on May 15th!


My first card features the latest addition to the Feathered Friends Collection, Feather Friends Mini 11 Stampers Set and Dies. The owl is stamped in Classic Kraft, Fine Linen, Dark Chocolate, True Black, Aqua Mist, and Tropical Teal Inks. The stamp set makes to easy to add details to the owl. 


The card front is die cut with the Border Bling: Joy Frame Die. I cut the die from Stamper's Select Cardstock and then added a panel of cardstock behind the cut outs where I had lightly blended Lemon Drop Ink. 


The flowers and leaves are created with the new Into the Blooms II Dies and the sentiment is from the new Say It Essentials Stamp Sets. This new sentiment set includes stamps for so many different occasions! 


My second card features the new Perfect Pair Essentials: Essentials Stamp Set and Dies. I really like the font in this stamp set. The wreath is created with the Wreath Favor Box Sentiments Stamp Set and the Wreath Favor Box Sentiments Die Set. 


The pattern in the background is created with the Cover Plate: Ornate Die and framed with the Border Bling: Skinny Stitched Frame Die. 

Thank for taking look.  Stop by the Papertrey Blog for more more inspiration with the new products.

5/13/21

Ink to Paper Sneak Peeks Day 3

I am back today for Day 3 of the Ink to Paper May Release Sneak Peeks. Today is all about celebrating America and the 4th of July.  Everything will be available for purchase beginning at 10 PM EDT on May 15th!


My cards are created with the new Love to Layer: American Flag and To Die For Sentiments: God Bless America Die. There are three die included in the  Love to Layer: American Flag Die, making this flag quick, and easy to put together. 


For the front of the card I die cut the previously released Border Bling: Twinkle Die from Stamper's Select White Cardstock and added a panel of Dark Indigo Cardstock behind the stars. 


I attached the flag to the card front with foam tape and added the sentiment with the To Die For Sentiments: God Bless America Die. 


On my second card I wanted to make the sentiment the focal point of my card. So I cut a piece of vellum to go over the flag. 


I die cut the sentiment twice, once from gold glittered cardstock and once from Pure Poppy Cardstock. I glued the two die cuts together, slightly offsetting the two colors. 

Thanks for taking a look! I will be back tomorrow with my Day 4 Sneak Peek. Stop by the Papertrey Blog for more more inspiration with the new products.


5/12/21

Ink to Paper Sneak Peeks Day 2

Hi and welcome to Day 2 of the sneak peeks at the Ink to Paper May Release. Today I have two more projects to share with you, the new addition to the Feathered Friends Die Collection, the first vase in the new Vase Collection, and some pretty floral die cuts. Everything will be available for purchase beginning at 10 PM EDT on May 15th!


My first card features the new Feathered Friends 11 Dies and the Into the Blooms II Dies. I die cut the owl from Stamper's Select White Cardstock and blended inks on the part of the owl in Fine Linen, Classic Kraft, and Cocoa Bean Ink.


The flowers and leaves are created with the new Into the Blooms II Dies. I used colored cardstock but blended the details with a blender brush and inks. The frame is die cut with the Border Bling: Skinny Diagonals Frame Die. I finished off the card with a few gold jewels. 


Here is a look at the first vase in the new Vase Collection. Ink to Paper has so many pretty florals. It will be great to have pretty vases to fill. I stamped the body of the vase in Soft Stone Ink and then stamped the details in Versamark Ink and embossed with white embossing powder. I filled the vase with florals from the Blooming Thoughts Stamp Set and Dies. 


The background detail is die cut with the Border Bing: Tin Stitch Die and the frame in the middle is die cut with the Border Bling: Skinny Stitched Frame Die. At the bottom I added a strip of wood with the Woodwork Die. The sentiment is new this month, Perfect Pair: Commodities Stamp Set and Die. I just love this pretty font! 

Thanks for taking a look! I will be back tomorrow for Day 3 of sneak peeks. Stop by the Papertrey Blog for more more inspiration with the new products.

5/11/21

Creating Masculine Cards!

Hi! Today Taylored Expressions is releasing new products that celebrate the men in our lives for a number of different occasions, including Father’s Day! I know I never have enough masculine cards in my stash!!


Right now, through Sunday, May 16th (or while supplies last), You can get the Argyle Bundle for 15% off! The bundle includes the Argyle Stamp & Stencil Combo set and Diamonds Piercing Plate. The discounted bundle price is only available through Sunday, May 16th.

The combination of the new Pierced Diamond Cutting Plate and the Argyle Stamp and Stencil Combo makes such a fun background. First I die cut a panel of Sugar Cube Cardstock with the Pierced Diamond Cutting Plate and then used the set of three stencils to add the pattern. I used a combination of Gumball, Blueberry, and Spearmint Ink. 


I framed the background with the largest die in the Stitched Frames Stacklets 1 with Gumball Cardstock. I used the new On the Block - Dad Stamp and the On the Block - Dad Shadow for the larger sentiment, stamping Blueberry Ink on Spearmint Cardstock. The additional sentiments are from the new Simple Strips - Man Myth Legend


My next card features the fun new stamp set and dies, Hoppy Days. I started by creating the background. I used just the the stamp in the Argyle Stamp and Stencil Combo, stamping Oreo Ink on Sugar Cube Cardstock. Then I used the Stitched Circle Stacklets to cut a circle directly into the card front. 


Then I added a smaller circle of Sugar Cube Cardstock to the center of the card. I added detail to the background of the circle with the Diamonds Piercing Plate. I stamped and die cut the beer mugs and added a little extra foam to the beer with Nuvo Drops and TE All that Glitters - Sugar Cube Glitter. 
Makes such a great card for the craft beer lovers in your life! 


Stop by the TE Blog for all the detail and more inspiration! 

Ink to Paper May Release Sneak Peeks Day 1

 HI and welcome to Day 1 sneak peeks at the Ink to Paper May Release Sneak Peeks. May's release is full of sunshine, shells, and all the signs of summer, although with pretty flowers and a new vase collection.  Everything will be available for purchase beginning at 10 PM EDT on May 15th!


First up is a look at the new Message in a Bottle Stamp Set and Dies. This is such a fun, creative idea! I combined the stamp set with the new Summer Shells Dies and the Just Sentiments: Summer Stamp Set. 

The first step is to create the background. I cut a piece of Stamper's Select White Cardstock to fit the card front. Then I blended Classic Kraft, Cocoa Bean, and Aqua Mist Ink to create the feel of sand and water. Then I splatter gold paint on the background. 


I die cut the bottle and stamped the details on the bottle with Versamark Ink and embossed with white embossing powder. Then I blended Aqua Mist Ink over the embossing. I used one of the stamps in the set to create the scene in the bottle. Then I added the seashells around the bottle.


You can add a message to the bottle with the stamps and dies in the set. Such a cute idea! The sentiment at the top of the card is from the new Just Sentiments - Summer Stamp Set. 


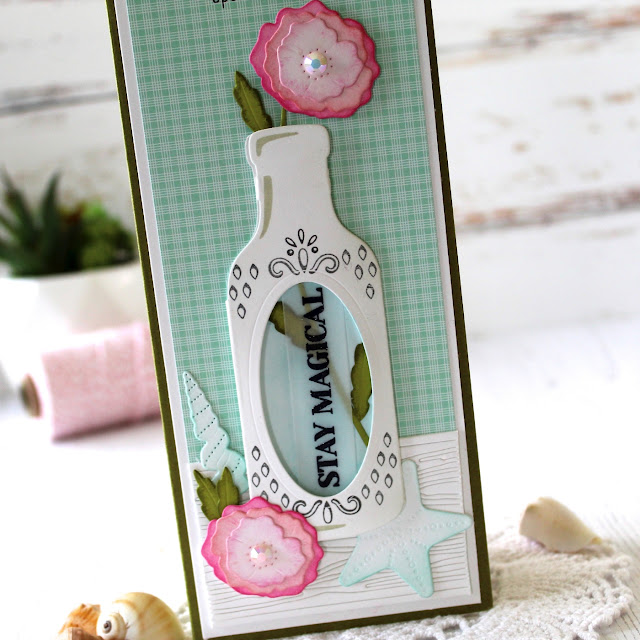
Here is another way you can use the bottle. The Message in the Bottle Die Set included the dies to cut the flowers, leaves, and stem, making the bottle perfect for a vase. I stamped the sentiment on Vellum so that you could see the other details in the bottle. 


The sentiment at the top is from the new Inside Greetings: Summer Stamp Set. I also a few shells with the Summer Shells Die Set. 


At the bottom I added the woodgrain panels with the Woodwork Die and added jewels to the center of the flowers. 


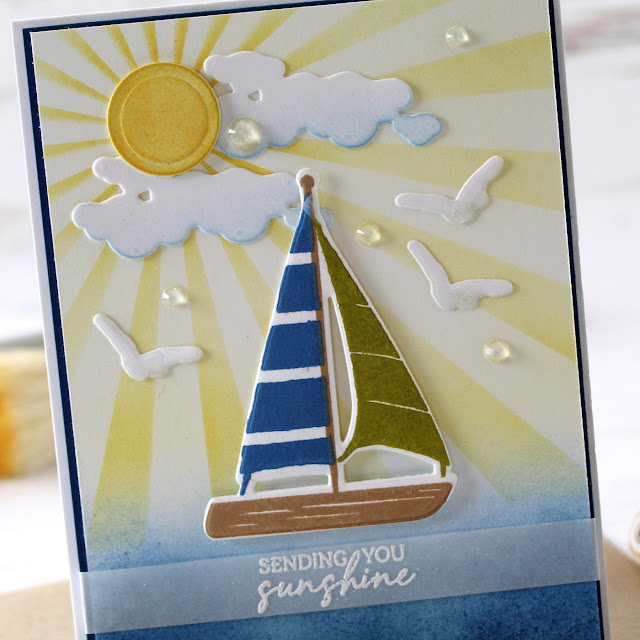
Here is another idea for the new Summer Shells Dies. I die cut the shell from Stamper's Select White Cardstock and then blended ink on the shells and highlighted the details with a white gel pen. In the background I stenciled the sun rays and added Blueberry Ink at the bottom. 


I stamped one of the great summer sentiments from the Just Sentiments: Summer Stamp Set in Dark Indigo Ink on Classic Kraft Cardstock. 


On the inside I stamped a sentiment from the Inside Greetings: Summer Stamp Set in Blueberry Sky Ink. 

Thanks for taking a look! I will be back tomorrow for Day 2 of sneak peeks. Stop by the Papertrey Blog for more more inspiration with the new products.

5/8/21

Spellbinders Large Die of the Month for May

Hi all! I am popping in today with a card I created with the the Spellbinder Large Die of Month for May, Stitched Card Front, Border & Flower

Membership Includes:

Exclusive Larger Set of Versatile Dies that cut, emboss, deboss and stencil. Double the size of the Small Die Set! $40 Value!

Project Inspiration: Each kit will feature project ideas with at least one detailed how-to instruction tutorial each month.

Member Benefits & Savings: Receive exclusive member pricing in the Spellbinders store. Plus receive access to deals, savings, and gifts - only available to members.


The die set includes this beautiful card front die, a border die, a single flower and leaves, and a large die to cut the card front. I decided to work with the larger die. I cut the panel from white cardstock and pulled out my collection of DMC Floss that I have in my stash for probably 20 years! If you didn't want to stitch you could add colored cardstock behind the die cuts for another pretty option. 


Behind the front panel I added a piece of vellum and a panel of Waterfall Cardstock. 


In the center I added a sentiment from this month's Clear Stamp of the Month Club and added a few jewels to center of the flowers. 

Have a great weekend! You can find all the Spellbinder Clubs here