3/27/19

Flying By To Say Hello

Hi Friends! Thanks for stopping by today! I have another spring inspired cards to share, created with the Pretty Pink Posh Beautiful Butterflies Stamp Set. I played with a different color combo, bringing in some bright blues, aquas, and reds.


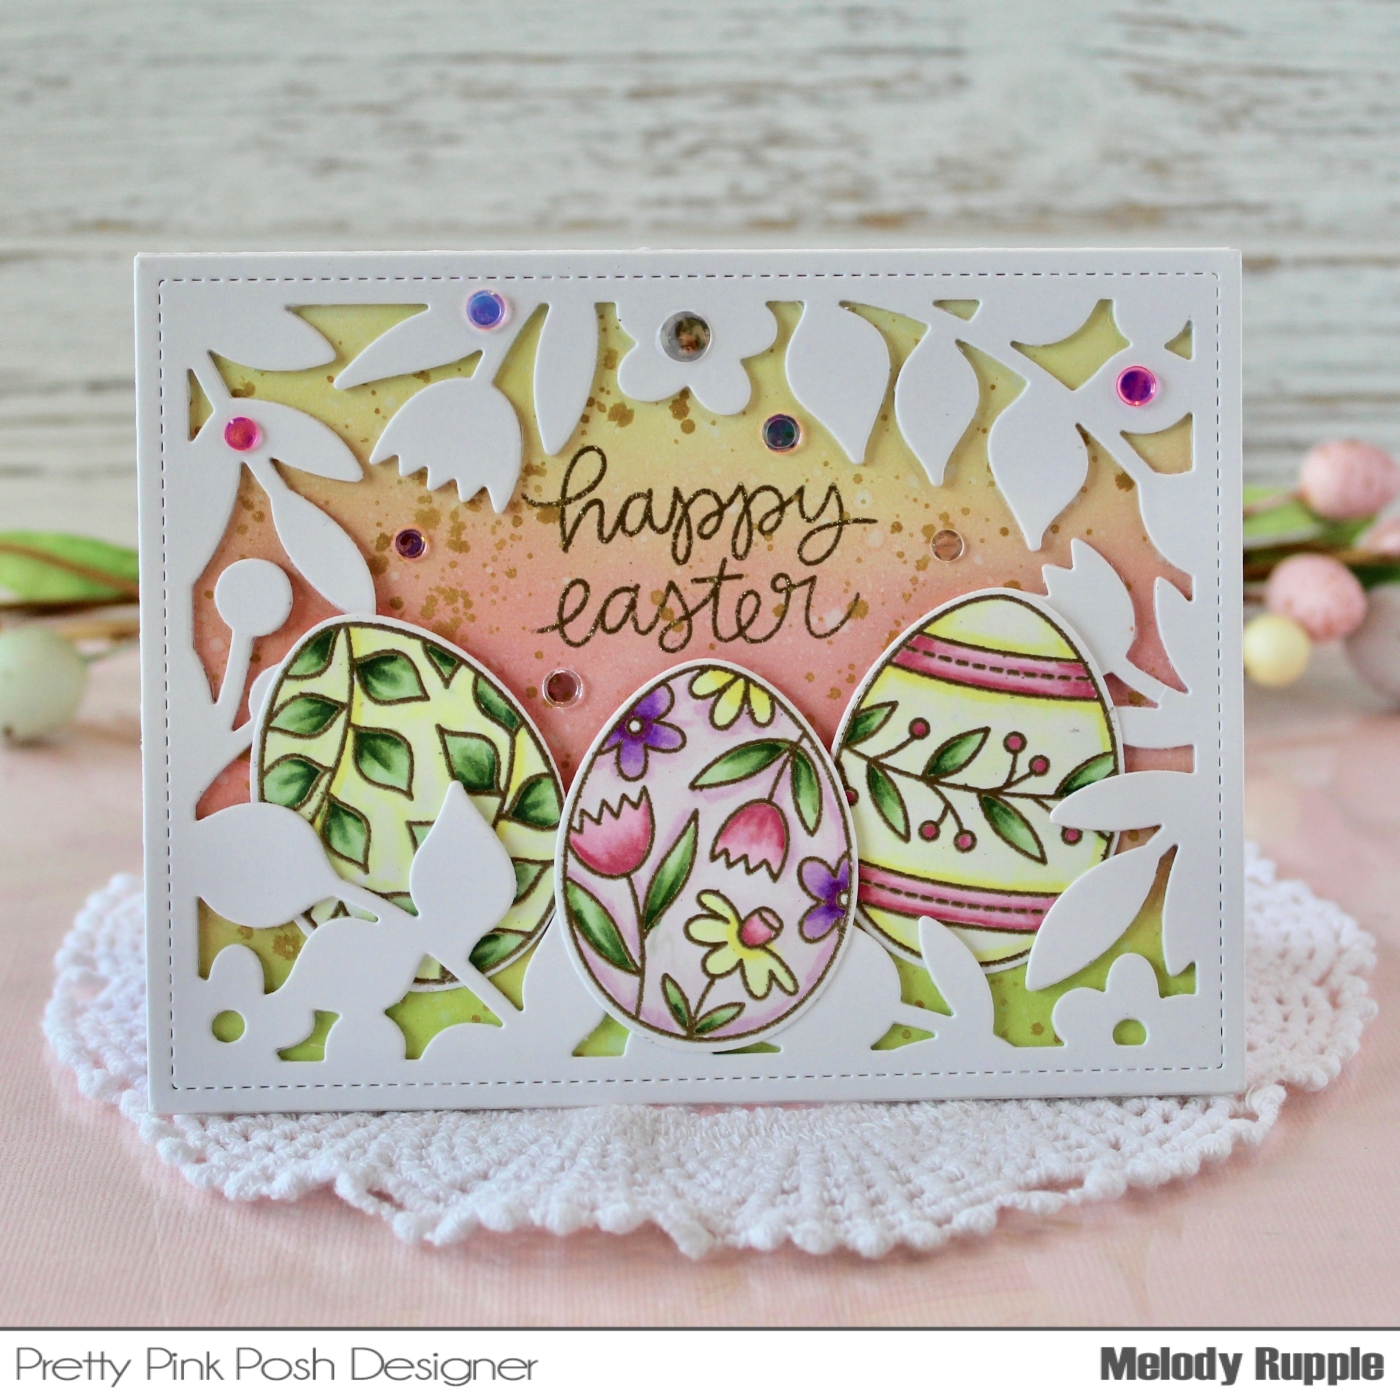
I stamped three of the butterflies in the Beautiful Butterflies Stamp Set and leaves and flowers from the Spring Wreath Stamp Set in black ink. The images are colored with Copic Markers and then die cut the coordinating dies. (links are below)

I used a stencil to add a light background of clouds to the card front then used the Scallop Hexagons Dies to cut directly into the cad front. Then I used the die again to cut the frame and inlay it into the card front. I added foam tape behind the card front to add dimension. The sentiment is included in the stamp set. I arranged the foliage and butterflies around the sentiment and added a little sparkle with a few Blue Lagoon Jewels Jewels.


Have a great day! If you would like to follow me on Instagram you can find me HERE.

3/25/19

Spellbinders New Collections Blog Hop


Hi and welcome the the Spellbinder New Collections Inspiration Blog Hop featuring the new Happy and Gilded Age Products! You should have arrived here from Jacquie Dean's Blog. You can find a full list of designers participating in the Hop below. 


My first card features the new Shapeabilites Sending a Happy Birthday Etched Dies Happy by Sharyn Sowell. This die set creates such a cute scene! I created the background for the 5 x 5 card front by stenciling clouds and adding a border of patterned paper at the bottom. 


All the die cuts I used to create this card are included in the Sending a Happy Birthday Etched Dies Set, including the sentiment. I cut the little girl twice, once from white cardstock and again from a teal cardstock. To create the dress I cut off the legs, arms, and head. I also die cut the sentiment twice, once from a bright pink cardstock and again from yellow cardstock. Then I layered the pink over the yellow, offsetting just a bit to leave the yellow shadow. 


My second card is created with the new Gilded Vines Glimmer Hot Foil Plate The Gilded Age by Becca Feeken. I used the Glimmer Hot Foil System and Glimmer Hot Foil in Skybright to foil the die. 


The sentiment is from the Captured Sentiments Clear Stamp Set. I accented the foil with clear sequins and lace. 

To celebrate this release, we are giving away a $50 gift certificate to 3 lucky blog readers – selected from the comments across all of the blogs in the hop. Giveaway closes on Sunday, April 7th 11:59 pm EDT. Winners will be announced in our blog hop post the following Monday. Winner is responsible for shipping cost, duties and taxes.

Thanks for stopping by! Now hop on over to Desiree Kuemmerle's Blog for more inspiration. 

Melody Rupple (You are here)


3/22/19

Easter Greetings

Happy Friday! After a few days of rain I am looking forward to some sun this this weekend. With Easter around the corner I have a card to share that I created with the Big Blooms - Lily Stamp Set.


I stamped the flowers in TE Oreo Ink on watercolor paper and colored with my Zig Clean Color Real Brush Markers. Then I die cut the lilies with the Big Blooms - Lily Die. The sentiment is from the Cutting Edge - Spring Stamp and Die Combo. (see product links below) 


I created the card front with a strip of checked paper from the Playful Patterns - Sweet Paper Pack, a small strip of Peapod Cardstock, a little bit of lace, and white cardstock brushed with Potato Chip Ink. I finished off the card with a scattering Peapod Enamel Shapes. 

Thanks for stopping by and have a great weekend! 


3/19/19

You Are Amazing

Thanks for stopping by today! I have a card to share that I created with the new Peacock Friends Stamp Set from Pretty Pink Posh. It is such a cute stamp set!!


 I colored the peacock with Copic Markers, blending blue to green on the Peacock tail. Then I die cut the Peacock with the Peacock Friends Coordinating Dies. I created the background by blending Distress Ink in Shabby Shutters, Broken China, and Tumbled Glass. I spritzed the paper with water and them splattered on a gold paint.


I cut a circle directly into the card front with the Scallop Circles Dies and used the same die to cut the gold frame. I inlayed the frame into the card, and added foam tape and black cardstock behind the frame. The sentiment is included in the Peacock Friends Stamp. I added a scalloped border under the sentiment with a border die in the Stitched Borders Dies. I finished off the card with a stream of jewels in Metallic Gold and Midnight Black.


Thanks for taking a look! 


3/15/19

Spring Inspired Happy Birthday

Hi Everyone! Yesterday was such a beautiful day here! There were SO many butterflies filling the sky! And I love that is light longer! Today I have a birthday card to share that feels like spring. The card is created with some my favorite Taylored Expressions products.


First let's talk about the background. I stamped the Buffalo Plaid Background Stamp in Versamark Ink on Potato Chip Cardstock and embossed with TE White Embossing Powder. I love this background stamp! Next I used the Stitched Circle Stacklets to cut a circle directly into the card front and then used  Stitched Circle Stacklets and the Inside Scallop Circle Stacklets to create the frame. I added foam tape behind the card front for extra dimension. 


Inside the circle I stamped a sentiment from the Simply Said - Birthday Stamp Set in Oreo Ink. Next I created the daisy with the Layer It - Daisy Dies and the Mega Leaves Dies. I cut the leaves from watercolor paper and used Liquid Watercolor in Peapod to watercolor the leaves. 


Thanks for stopping by today! Have a great weekend! 

3/14/19

Happy Collection Inspiration with Spellbinders

Hello Friends! I am the Guest Designer on the Spellbinders Blog again today! I have several more projects to share created with the new Sharyn Sowell Happy Collection. I created two cards and a scrapbook page to share with you. 


Let’s start with my 12 x 12 scrapbook page. I thought the wedding photos would look pretty with the new Vine Glimmer Hot Foil Plate. I used the Spellbinders Glimmer Hot Foil System with the Glimmer Hot Foil Roll in Gold to foil the pretty vine on a peach cardstock.


To accent the gold vines I die cut flowers, leaves, and vines with two of the die sets in the Happy Collection, the It’s Your Day Etched Dies and the Celebrate With Cake Etched Dies.


I added the flowers, leaves, and vines in a few clusters on the page and accented the centers of the flowers with gold and clear jewels.


I added the flowers, leaves, and vines in a few clusters on the page and accented the centers of the flowers with gold and clear jewels. I used It’s Your Day Etched Dies to create the sentiment on the scalloped circle. It finished the page off perfectly!


For my second project I created a birthday card with the Celebrate With Cake Etched Dies. This die set creates such a pretty birthday cake. I think you could leave the candles off and it would make a beautiful wedding cake! I used silver foil for the cake stand and behind each layer on the cake.


The flowers and leaves are included in the die set and colored with Distressed inks. I created the background by blending Worn Lipstick, Spun Sugar, and Squeezed Lemonade Oxide Distress Ink and splattering the card front with watered down white paint.


I created the scene on my second birthday card with the Let’s All Party! Etched Dies . I die cut the tree from white cardstock and colored with Copic Markers. Then I die cut all the animals. I decided I would add color with the party hats, so I die just the top of the animals from colored cardstock, cut off the hats, and attached them to the animals.


I created another background with Oxide Distress Inks. I added a sentiment from the Captured Sentiments Clear Stamp Set.


OTHER SUPPLIES

Neenah 110lb Classic Crest Cardstock, Taylored Expressions Cardstock Peaches’n Cream, Peapod, Cilantro, Toffeel, Lollipop Oxide Distress Inks in Worn Lipstick, Spun Sugar, Squeezed Lemondade, Peeled Paint, Shabby Shutters, Tumbled Glass, Versamark Ink, White Embossing Powder, Taylored Expression Cherry Pop Ink Pretty Pink Posh Sparkling Clear Confetti Mix, Metallic Gold Jewels.
Thanks for stopping by the blog today! You can find the full Happy Collection by Sharyn Sowell HERE. I hope I have given you some inspiration for working with the new Happy by Sharyn Sowell Collection.

3/12/19

Happy Inspiration | Foiled Silhouette Cards With Spellbinders

Hi Everyone! I am excited to be the Guest Designer on the Spellbinders Blog today! I am sharing projects created with the new Sharyn Sowell Happy Collection. Today I have  two cards showcasing two of the new Glimmer Hot Foil Plates in the Collection. 


I used the Glimmer Hot Foil System with the Glimmer Hot Foil Plates to create my cards. My first card features the new Baby’s Birthday Glimmer Hot Foil Plate Happy by Sharyn Sowell.


I used the Rose Gold Glimmer Hot Foil with a 110 lb. white cardstock to create the silhouette.


I cut a 4 ¼ x 5 ½ card base from pink cardstock. For the card front I cut a patterned paper and green cardstock to fit inside the card base. I used an Oval Die to cut the oval directly into the card front, using one size smaller die for the green cardstock.


On the back of the green cardstock I added double sided foam tape to add a little dimension to the card.


I created some additional embellishments for my card with other die sets from the Sharyn Sowell Happy Collection. The “Happy Birthday” sentiment is die cut with the word dies in the Sending A Happy Birthday Etched Dies and the flowers are created with dies in the Celebrate With Cake Etched Dies. One of the great things about the collection is that many of die and glimmer plates work so well together!


Here is look at the completed card. So perfect for a sweet baby girl’s birthday.


I created a second card in a similar fashion using the Baby’s Garden Hot Foil Glimmer Plate and Skybright Glimmer Hot Foil Roll.
Spellbinders Supplies: 


OTHER SUPPLIES:

Neenah 110lb Classic Crest Cardstock, Taylored Expressions Cardstock in Guava, Granny Smith, Sprinkles, Checked Pattern Paper, Taylored Expressions Ink in Guava and Granny Smith, Moda Scrap Let Your Soul Bloom Paper Pack, Pretty Pink Posh Lemon Drop Jewels.
Thanks for stopping by the blog today! You can find the full Happy Collection by Sharyn Sowell here. I will back on the blog on Thursday with few more projects created with this collection.

3/8/19

Pretty Pink Posh March Release Blog Hop Day 2

Hi and welcome to the Day 2 of the Pretty Pink Posh March Release Blog Hop. I have two cards to share with you today.  Be sure to leave a comment as you hop! There are 4 $25 gift certificates up for grabs (two winners each day). Winners will be picked randomly along the blog hop. Comments must be left by 11:59 PM PST on 3/13/2019. Winners will be announced on the PPP blog.

My first card features the new Magnolia Flowers Stamp Set and the Magnolia Flowers Coordinating Dies. The flowers are colored with Copic Markers and then die cut. I arranged the flowers and leaves on the card leaving room for the sentiment, die cut with the new Thinking of You Script Die


To create the background I sponged on Distress Inks in Peeled Paint, Shabby Shutters, and Squeezed Lemonade. The finishing touch is a scattering of Ivory Jewels


My next card celebrates Easter. I started by cutting the frame with the new Spring Frame Die from white cardstock. Then I stamped three of the Easter eggs in the Easter Eggs Stamp Set in Versamark Ink and embossed with Gold embossing Powder. The eggs are colored with Copic Markers and die cut with the Easter Eggs Coordinating Die

The background is created with Oxide Distress Inks in Twisted Citron, Worn Lipstick, and Squeezed Lemonade and a splattering of gold paint. I finished off the card with sequins from the new Easter Confetti Mix

Here is the complete blog hop list for today: 


Thanks for stopping by!

3/3/19

It's March Release Day at Pretty Pink Posh!

Hi Everyone! The new Pretty Pink Posh March Release is available today! I think this release if one of my very favorites! Today I am sharing a card with the Spring Wreath Stamp Set and the Spring Wreath Coordinating Dies. It may still be cold and rainy here but I know Spring is around the corner!


I starting by stamping the wreath and extra foliage in brown ink. I like the softer ink with the Spring colors. I colored the images with Copic Markers and added a few highlights to the leaves with a colored pencil. Next I die cut all the images from the stamp set and added foam tape to the back of the wreath. I cut of piece of lavender cardstock to fit behind the wreath and stamped the sentiment included in the stamp set.


I created the card front with pale green cardstock, a small checked pattern, and a piece of lace. I added the wreath to the front of the card and then embellished the card a little more with the other die cuts. I finished off the card with a scattering of sequins from the new Wisteria Blossoms Confetti Mix

You can find the new release HERE. We will be having a two day Blog Hop later in the week! 

Thanks for stopping by my blog! You can follow me on Instagram too!