3/25/25

Nature's Canvas Cardmaking Kit

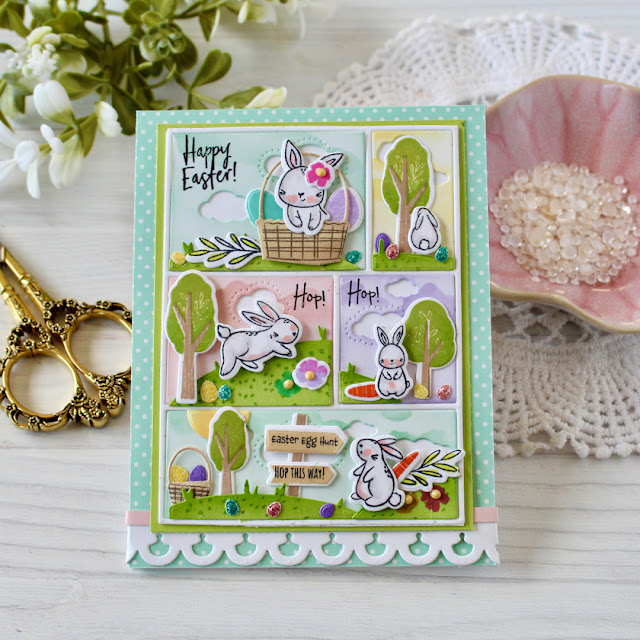
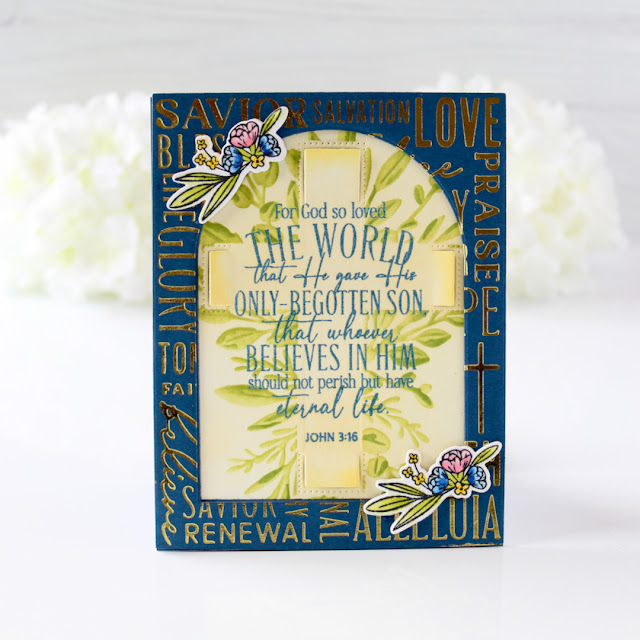
Hi Crafters! Today I have projects to share that I created with new Nature's Canvas Cardmaking Kit from Taylored Expressions. The Nature's Canvas Stamp Set includes four pretty floral images that can be watercolored, colored with alcohol markers or blended with the Nature's Canvas Coloring Stencils. I used the stencils for my projects. 


I stenciled the floral images with a combination of Cupcake, Raspberry Sorbet, and Mulled Wine Inks for the larger flowers, Macaron Ink for the smaller florals, and Kiwi and Dill Pickles Inks for the leaves using a combination of my TE Detail Blender Brush and my TE Bitty Blender Brushes. 


I die cut the images with the Nature's Canvas Dies, which are available for purchase separately. Behind the flower I added a panel of Sugar Cube Cardstock that I lightly blended with Cupcake Ink and die cut with the Talking In Circles Piercing Plate Die. 


I framed the card with the Frame in Frame 2 Cutting Plate and used Mulled Wine Cardstock for the card base. I also added a few Bits & Pieces: White Foil Dots. 


The sentiments on my cards are stamped with the Timeless Greetings Stamp Set, which is included in the cardmaking kit. I die cut the sentiment with the coordinating Timeless Greetings Dies, that are available for purchase separately. 


For my second card I created a mini slim card with another image from the Nature's Canvas Stamp Set. The background is embossed with the Sweet Squares 6 x 6 Embossing Folder. I used Sugar Cube Cardstock and blended Cupcake Ink over the embossing and splattered white paint. 


I added a strip of Raspberry Sorbet Cardstock at the bottom with the Easy Strips - 1/2" Stitched Dies. This sentiment is also included in the Timeless Greeting Stamp Set. 


I used the Little Bits - Butterflies Dies to added the three butterflies. I added vellum over Raspberry Sorbet Cardstock. 

  • Nature's Canvas Stamp Set
  • Nature's Canvas Coloring Stencil
  • Timeless Greetings Stamp Set
  • The Insiders - Nature's Canvas
  • Taylored Tutorial instruction sheet
Kits go fast and most items are not available to purchase outside the kit. New to the kits this year, we’re introducing the Taylored Tutorial instruction sheet, which provides step-by-step guidance for creating a special project using the kit's contents.

Pair your kit with these coordinating products to round-out your projects:
Get the Big Nature Bundle that includes the kit along with each of the additional coordinating products ensuring you have one of everything.

Stop by the TE Blog for all the details and more inspiration from the Team. 

3/18/25

Easter Greeting

 Hi and thanks for stopping by! Today I have Easter and Spring projects to share that are created with new products from the Pretty Pink Posh March Release. This collection features eggs, bunnies, tulips, butterflies, and more to inspire all your upcoming Easter and Spring projects! You can find all the new products now in the PPP Store. 


My first card features the Carrot Shaker die, the Upright Greeetings: Easter, and the adorable Springtime Borders Stencils. 

I created this carrot shaker by die cutting the Carrot Shaker four times. I glued the layers together adding acetate to the first layer. Then I dropped in Sugar Pop Shaker Beads.


I attached sentiments from the Upright Greetings: Easter Stamp Set at the top of the carrot. I die cut the sentiments with the Sentiment Strips Dies. 

The background is stenciled with the Springtime Borders Stencils. I think this such a cute stencil! I die cut the card front with the Stitched Torn Rectangles Dies. 

I have a second shaker card I created with the Tulip Shaker Dies. On this card I just created a shaker with the tulip part of the flower but can create a shaker in the leaves too. For this shaker I used the new Spring Flowers Clay Confetti. I love those little flowers in the confetti. 


To create the background I used both the Watercolor Rectangle Mask Stencil and the Line Bursts Stencil. First I stenciled with the Watercolor Rectangle Mask Stencil using a light yellow ink. Then I placed the  Line Bursts Stencil over the Watercolor Rectangle Mask Stencil and stenciled with a brighter yellow ink. 

The sentiment is from the new Easter Greetings Stamp Set and die cut with the coordinating dies. I added the fence at the bottom with the Picket Fence Die. 

I splatter a little gold paint no the background and add a few gold gems. 

Next up is a look at the new Bunny Holder Dies and the Easter Holder Additions Dies. 

First is put together the bunny, die cutting from white cardstock, added the sweet face, ears, and bunny tail. I added a little pink ink to the bunny cheeks. The Easter Holder Additions Dies gives you a number of options to create items for the bunny to hold. I created and filled the Easter basket and flowers with the die set. 

I die cut grass with the Nature's Essentials Dies. I used the Eyelet Rectangle Dies to die cut the card front. 

The sentiments are from the Upright Greetings Easter Stamp Set. 


Thanks for taking a look. I hope you have been inspired to start creating your Easter and Spring projects! You can find all the new products here

Pick Your Pairings Release at Taylored Expressions

Pick Your Pairings week is all about what TE customers want to coordinate with a current TE product. Taylored Expressions asked the Fans of TE Facebook Group what they would like to see! I have two projects to share with the customer inspired products. The new stamps and dies are available now in the TE Store


The  Sandy Shores Split 6x6 Background Stamp is such a great scene building stamp set and the new Gus & Gertie - Make a Splash Stamp Set and Die combo is so fun with the background stamp.  


I stamped the water in Rock Candy and Confetti Cake Inks and the sand in Toffee Ink I splattered the background with white paint and then added brown watercolor splatters to the sand. I also added a few white drops from the Tiny Diamonds - Bold. 


Gus and Gertie are colored with Olo Markers. I created the umbrellas with the Under My Umbrella die set.The card front is die cut with the Frayed Edge Stacklets. 


The sentiment is included in the Gus & Gertie - Make a Splash Stamp Set and Die combo.


Next is a look at the Tall Tales Alpha Die Set and the coordinating Foil It - Mini Slim Drop Shadow Sentiments. First I stenciled the background with the Rotating Hearts Stencil with Cupcake and Guava Inks. Then I foiled the panel with TE Gold Stars & Sparkle Fun Foil.


I die cut each letter from a different color cardstock that are linked below. The foiled shadows make the letters easy to line up.


I used the Mini Slim Postage Stamp Stacklets to mat the foiled panel. 

When you spend $200+ site wide, you’ll receive a free $25 coupon card* to use on a future order of $25 or more!

Thanks for stopping by! Stop by the TE blog for more inspiration from the team.


3/17/25

Papertrey Ink March Release Countdown Day 4

Welcome to Day 4 of the Papertrey Ink March Release Countdown. I have two more projects to share with you today, perfect for the Easter season.  All the new products will be available tomorrow, March 18th at 12 PM EST.


How cute are the new Build-A-Lamb Dies! The die set also includes Dies for stitching if you want to create a stitching project. I die cut the lamb from Stampers's Select White Cardstock and then lightly blended Soft Stone Ink on the edges. 


I used Copic Markers to color the lamb's face and then added the cheeks, nose, and eye. I added the bow with the Bows Galore Die. The florals and greenery are also included in the die set. 


I die cut the background with the Love to Layer: Deckled Edges Dies. I lightly blended clouds in the background. The sentiments are from the new This is Big Sentiments: Blessing. 


The card front is die cut from Stamper's Select White Cardstock with the Border Bling: Tin Stitch Die. Then I blended the edges with New Leaf Ink.

Supplies: 

Stamps: This is Big Sentiments: Many Blessings
Dies: This is Big Sentiments: Many Blessings, Build-A-Lamb, Border Bling: Tin Stitch, Love to Layer: Deckled Edges, Bows Galore
Ink: Sweet Blush, Pale Peony, Hibiscus Burst, Plum Pudding, Winter Wisteria, Lemon Tart, Summer Sunrise, New Leaf, Green Parakeet, Aqua Mist, True Black
Paper: Stamper's Select White, Sweet Blush, New Leaf, Green Parakeet, Plum Pudding, True Black
Other: PTI Clear Gems, Foam Tape, Blender Brushes, Cloud Stencil


This card is created with the new Flourished in Faith Stencil. There are three stencils in the set, one for the cross, one for the base of the greenery, and a third stencil to add details to the greenery. Before I started the stenciling process I lightly stenciled clouds in the background with Spring Rain Ink. 


I added the flower and leaves with the new Into the Blooms: Radiant Florals Dies. I used white cardstock for the flower and then blended Lemon Drop and Summer Sunrise Inks. 


I used the new Line It Up Faith Dies to add the sentiment with gold foil cardstock. The card front is die cut with the Love to Layer: Torn Edges Dies.

Supplies:
Dies: Line It Up Faith, Into the Blooms: Radiant Florals, Love to Layer: Torn Edges
Ink: Fine Linen, Classic Kraft, New Leaf, Pinefeather, Dark Indigo, Spring Rain, Lemon Tart, Summer Sunrise
Paper: Stamper's Select White, Dark Indigo, Gold Foil
Other: Flourished in Faith Stencil, Gold Gems, Gold Paint

Thanks for stopping by! Stop by the PTI Blog for more inspiration from the team. 

3/16/25

Papertrey Ink March Release Countdown Day 3

Welcome to Day 3 of the Papertrey Ink March Release Countdown. I have two more projects to share with you today, perfect for the Easter season.  All the new products will be available on March 18th at 12 PM EST.


My first card is created with the new Frame In Easter Stamp Set and coordinating Frame In Easter Dies. The set includes dies to cut the frame, the scenery backgrounds, and many sweet images to build a scene. 


I die cut the frame and backgrounds from Stamper's Select White Cardstock, and then ink blended the background in different ink colors. I also added a few sentiments to the scenes. 


I inlayed the scene background back into the frame and then built each scene. 


At the bottom I added a border I die cut with the On the Edge: Scallops Collection Die

Supplies:

Stamps: Easter In Frames
Dies: Easter in Frames, On the Edge: Scallops Collection
Ink: Aqua Mist, Hawaiian Shore, Lemon Tart, Sweet Blush, Hibiscus Burst, Green Parakeet, Mowed Lawn, Lilac Grace, Cocoa Bean, Fine Line, Classic Kraft, True Black
Cardstock: Stamper's Select White, Sweet Blush, Green Parakeet, Bitty Big Collection: Aqua Mist
Other: Glittered Cardstock, Olo Markers, Foam Tape, Yellow Dots


My next card is created with the Reflections: John 3 Stamp Set and coordinating Dies and the Risen Hot Foil Plate. I stencil with a few of the stencil in the new Flourished in Faith Stencil to add the greenery. 


I used the Risen Hot Foil Plate with gold foil on Enchanted Evening Cardstock for the card front. Then I used the largest die in the Love to Layer: Arches Die to cut the opening in the center of card. 


I added the flowers in the corners with The Bigs Easter Sentiments Stamp Set and Dies. 

Supplies:
Stamps: Reflections: John 3, The Bigs Easter Sentiments
Dies: Reflections: John 3, The Bigs Easter Sentiments, Love to Layer: Arches
Ink: Lemon Tart, Green Parakeet, New Leaf, Versamark
Paper: Enchanted Evening, Stamper's Select White
Other: Risen Hot Foil Plate, Flourished in Faith Stencil, Ranger Uncharted Mariner Embossing Powder, Memento Black Ink, Olo Markers, Gold Foil

Thanks for stopping by! Stop by the PTI Blog for more inspiration from the team. I will be back tomorrow with two more projects.


3/15/25

Papertrey Ink March Release Countdown Day 2

Welcome to Day 2 of the Papertrey Ink March Release Countdown. I have two more projects to share with you today, one for Easter and a pretty birthday card.  All the new products will be available on March 18th at 12 PM EST.


The star of my card is the pretty florals that are created with the new Into the Blooms: Radiant Floral Dies. I die cut the flowers from Stamper's Select White Cardstock and then did some ink blending. I have listed the ink colors I used below. Once my pieces were ink I splattered water over the ink and the glued the layers together. 


Next I die cut the Perfectly Coiled: Circle Die from pink glittered cardstock. I attached the circle to a piece of patterned paper and the then arranged the flowers and leaves around the circle. 


The sentiment is from the Birthday Your Way II Stamp Set and die cut with the coordinating dies. 


I also added pink jewels to the flowers and leaves. 

Supplies:

Stamps: Birthday Your Way II
Dies: Into the Blooms: Radiant Florals, Perfectly Coiled: Circle
Ink: Sweet Blush, Autumn Rose, Scarlet Jewel, Melon Berry, Lemon Tart, Summer Sunrise, Green Parakeet, New Leaf, True Black
Paper: Stamper's Select White, Scarlet Jewel
Other: Patterned Paper, Pink Glittered Cardstock, Dark Pink Jewels


Next up is a look at the Egg Hunt Dies and Egg Hunt Stencil. The Egg Hunt Dies included dies to die cut eggs and two dies to emboss pattern on your eggs. There are six stencils in the Egg Hunt Stencils. 


The large egg is stencil with one of the six stencils and on the smaller egg I used one of the patterned dies. I used a gel pen to highlight the pattern. I used the Into the Blooms: Radiant Florals again to add the flower and leaves. 


The sentiments are from the new This is Big Sentiments: Many Blessing. I die cut the grass with the Grassy Edge Die


The bunny is from a previously released die set, Spring Silhouette

Supplies:

Stamps: This is Big: Many Blessings
Dies: This is Big: Many Blessings, Egg Hunt, Grassy Edge, Into the Blooms: Radiant Floral, Spring Silhouette
Ink: Pale Peony, Hibiscus Burst, Raspberry Fizz, Aqua Mist, Lemon Tart, Green Parakeet, Mowed Lawn, Hawaiian Shores, 
Paper: Tropical Teal, Stamper's Select White, Green Parakeet, Pale Peony, True Black
Other: Egg Hunt Stencils, Dark Pink Gems, Aqua Watercolor

Thanks for stopping by! Stop by the PTI Blog for more inspiration from the team. I will be back tomorrow with two more projects.