Welcome to Day 1 of the Papertrey Ink September Release Countdown. This month is all about Christmas! All the products will available for purchase on September 26 at 12 pm ET. I have four festive projects to share with you today.

First up is a look at the adorable In Stitches: Gingerbread Builder Dies and the Border Bling: Skinny Ric Rac Dies. There are also dies for a Santa hat other cute options.

I used DMC White Embroidery Floss to stitch around the edges. This is optional. I just like the texture it adds. I used patterned paper for the dress and added Stickles here and there.

The Gingerbread is framed with the Border Bling: Skinny Ric Rac Dies. The sentiment is from the This is Big Sentiments: HoHoHo. I stamped in Versaamark Ink on Pure Poppy Cardstock and embossed with white embossing powder.
Supplies:
Stamps: This is Big Sentiments: HoHoHoDies: In Stitches: Gingerbread Builder, Border Bling: Skinny Ric Rack
Ink: Antique Linen, Ripe Avocado, Pure Poppy, Aqua Mist, Classic Kraft, Versamark
Paper: Ripe Avocado, Stamper's Select White, Pure Poppy, Classic Kraft, Silver Foil, Antique Linen, Sweet Blush
Other: Patterned Paper, Stickles: Star Dust, DMC White Floss

Next is a look at the This is Big Sentiments: HoHoHo. There are so many great small sentiments to go with the two larger sentiments. I also used the new Love to Layer: Stitched Circle Dies. The die set includes the sweet bow at the top.

The Santa hat is from the In Stitches: Gingerbread Builder Dies that I used on my first card. I used the Into the Blooms: Pine Dies to add the greenery and die cut the snowflakes with the Layered Snowflakes: Drift Die.

To create the background I used the Fanciful Snowflake Background Hot Foil Plate, which is one of my favorite Hot Foil Plates. I used white foil on Pure Poppy Cardstock. I added Star Dust Stickles to the pine needles and clear gems to the snowflakes.

My next project is created with the Christmas Laurel Hot Foil Plate and the Into the Blooms: Swag Dies. I used gold foil on Pinefeather Cardstock to foil the wreath. Then I die cut the card front with the Love to Layer: Postage Dies.

The Into the Blooms Swag Dies create this beautiful bow and greenery. The bow has four layers to create the dimension. After I die cut the greenery and berries and I lightly splattered gold paint.

The sentiment is from the previously released Christmas You Way Stamp Set and Dies.
Supplies:
Stamps: Christmas Your Way
Dies: Into the Blooms: Swag,North Pole Mail Postage Strap Frame Post Card, Christmas Your Way
Ink: Sweet Blush, Mint Julep, Ocean Tides, Pinefeather, Scarlet Jewel
Paper: Mint Julep, Ocean Tides, Pinefeather, Stamper's Select White, Bitty Big Collection: Sweet Blush, Gold Foil
Other: Christmas Laurel Hot Foil Plate, Gold Foil, Gold Gems, Gold Paint, Olo Marker
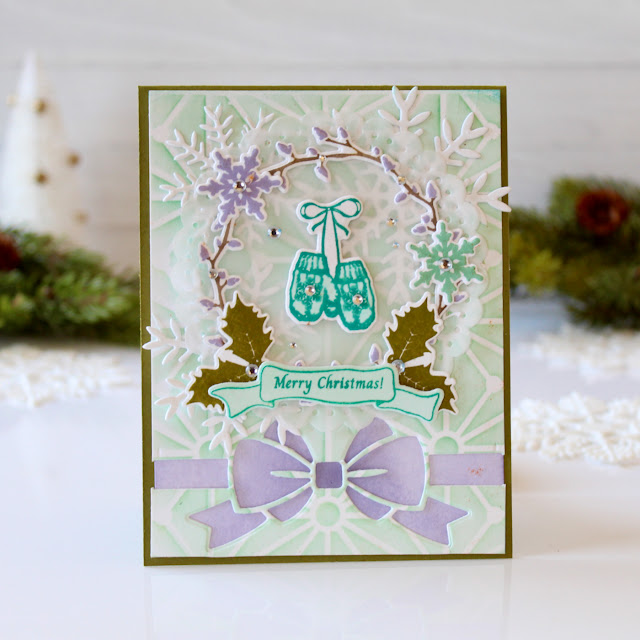
This is one of my favorite non traditional holiday color combo. I used Aqua Mist, Tropical Teal, Ripe Avocado, and Plum Pudding Inks which works perfectly with the new All Around Christmas Stamp Set and Dies.

After I stamped and created the wreath I attached it to vellum die cut with the Love to Layer: Stitched Circle Dies. The background is the stenciled with the Geometric Snowflakes Stencil Collection and Aqua Mist Inks.

I used the Elegant Edges: Bow Die to die cut the bow. I die cut directly into the card front and then added white cardstock blended with Plum Pudding Ink behind the die cut.
Supplies:
Stamps: All Around Christmas
Dies: All Around Christmas, Elegant Edges: Bow, Layered Snowflakes: Drift Die
Inks: Aqua Mist, Tropical Teal, Ripe Avocado, Plum Pudding
Paper: Ripe Avocado, Stamper's Select White
Other: Geometric Snowflakes Stencil Collection, Clear Gems
I love creating for the holidays and I hope you do too! Stop by the PTI Blog from more inspiration from the


No comments:
Post a Comment