12/30/20

There's Snow One Like You

Hi! I created a few thank you cards this week to send off to friends and family I couldn't see this holiday season. Today's winter themed card is created with the Winter Wonderland Stamp Set from Pretty Pink Posh. 


I started by cutting a piece of Lavender Cardstock for the card front and stenciled with the Snow Flakes Stencil. Next I cut a window in the card front with the larger die in the Window Frames Dies. See links below. I added foam tape behind the window and then a piece of white cardstock blended with Speckled Egg Distress Ink. 


I colored the images from the stamp set with Copic Markers. The snowflakes are stamped in Versamark Ink, embossed with white embossing powder and sponged with Speckled Egg Distress Ink. I added Pearl White Jewels to the center of the snowflakes. I also added glitter to the igloo. 


Thanks for stopping by 


12/23/20

A Few More Christmas Tags

I have finished up all my wrapping and I just thought I would share my last few tags for this year. They were quick and easy to create with the Stitched Poinsettias Dies from Pretty Pink Posh


I used the Stitched Banner Duo 1 Dies for the base of each tag along with some Christmas patterned Cardstock. I added a hole to the top of each tag and reinforced the hole with an eyelet. 


I cut the flower and leaves from white cardstock and used Distress Inks to sponge on the color. For my red Poinsettia I used Candied Apple and Fired Brick. All the leaves are blended with Rustic Wilderness and Forest Moss. 

On my white Poinsettia I just used a little Antique Linen Distress Ink. I added three Pearl White Jewels to the center of each flower. 

To create the pink Poinsettia I blended Spun Sugar and Worn Lipstick. All the sentiments are from the Holiday Signs Stamp Set and die cut with the Simple Strips Dies. 

Thanks for looking! 

12/17/20

Christmas Gift Card Holders

Wow, one week until Christmas! I have finished my shopping and am getting ready to start wrapping. Today I thought I would share a gift card holder I created with the Tag Pocket Die from Taylored Expressions


I always have a few gift cards to give at the holiday. I think a cute gift card holder makes the gift card a little more special. 


I cut the Tag Pocket Die from Sugar Cube Cardstock and the stenciled with the Mini Slim Stencil - Candy Cane Stripes with Cherry Pop Ink. The tag is easy to put together, just follow the score lines and use double stick tape to adhere the edges together. 


The cute Santa is from the St. Nick Background Cling & Clear Combo and die cut with the St. Nick's Head Die. I used the Stitched Circle Stacklets and the Petite Scallop Circle Stackles to added the circle to the center of the tag. The sentiments from from the Pennant Parade - Christmas Stamp Set. I finished off with a few Bits & Pieces - Snowflakes. 

Thanks for taking a look! 

12/15/20

Hello Friend

Hi! Taylored Expressions is releasing the products from three previously kits as individual products. Today’s release includes 15 products that were originally part of our Farm Fresh, Field Notes, and Hey There Kits released earlier this year. You can now purchase these items individually! You can find all the products HERE. 

My first features products from the Field Notes Kit. The flowers are stamped with the Sketchbook Florals Stamp Set. (See links below) Honestly, this is one of very favorite stamp sets I have ever owned! The flowers are watercolored with Karin BrushmarkerPRO Markers. I used the Masking Stencil - Frayed Edges to create the background behind the flowers. I stamped the dots with a stamp in the Field Notes Stamp Set and then die cut with the Frayed Edge Stacklets. 


The card front is stamped with the Rough Draft Background in Versamark Ink and then I embossed with TE White embossing powder. Using my TE Blender Brushes I blended Gumball Ink on the background. The sentiment is included in the Sketchbook Florals Stamp Set and die cut with the die in the Sketchbook Florals Die. 


My second card features products from the Hey There Kit. These are such happy products! I went with a color theme of Pineapple, Peaches' n Cream, and Guava Ink. The background is stenciled with the Hey There Sunshine Stencil. The card front is die cut with the Petite Scallop Rectangle Stacklets. 


The sentiment is stamped with one the options in the Hey There Stamp & Stencil Combo in Oreo Ink. Then I used stencils to add the coloring blocking. So easy and so striking! I die cut the sentiment with the Hey There Shadow Die. I also added a layer of Oreo Cardstock cut with the same die to outline the sentiment. The sentiment at the bottom is from the Good Vibes Stamp Set. 

Thanks for stopping by! 

12/14/20

It's Day 4 of the Ink to Paper December Release Sneak Peeks!

Hi Everyone! Today is the final day of the Ink to Paper December Release Sneak Peeks. I have two more cards to share with you. Everything will be available for purchase beginning at 10 PM EDT tomorrow,  December 15th!


My first card is created with the new Branches of Love Stamp Set and coordinating Dies. I wanted the vase to have a pottery look so I stamped in Fine Linen and Classic Kraft. Then I splattered on a little white paint. The branches are stamped in Spring Moss Ink. I created a variety of hearts to hang on the branches. I love the option of the two toned hearts. 


I added the look of a table for the vase to sit on with the Woodwork Die. The background is sponged with Sweet Blush Ink and the card is framed with the new Bling Border: Skinny Heart Frames Die. The sentiment is included in the Branches of Love Stamp Set


My second card features the new Like Family Stamp Set, a beautiful sentiment set to let your friends know how special they are. I stamped the sentiment on Sweet Blush Cardstock and then die cut with the Tagged & Labeled Die


I framed the card with the Border Bling: Joy Frame Die in Spring Moss Cardstock. I added a rectangle behind the sentiment with a pattern in the Bitty Big: Lilac Grace Color Collection and Amethyst Allure Perfect Match Cardstock. I accented the flowers with white jewels. 

Thanks for taking a look!  Stop by the Papertrey Blog for more more inspiration with the new products Everything will be available for purchase beginning at 10 PM EDT tomorrow.


12/13/20

Ink to Paper December Release Sneak Peeks Day 3

I am back for Day 3 of the Ink to Paper December Release Sneak Peeks. Today I have two more cards to share with you. Everything will be available for purchase beginning at 10 PM EDT on December 15th!


My first card is created with the new Dainty Daisies Stamp Set and coordinating Dies and the new To Die For Sentiments: Never Too Far Dies. I cut the sentiment out twice, once from Stamper's White Select Cardstock and once from a lightweight chipboard. I adhered the two die cuts together and then blended ink in Dark Indigo, Spring Moss, and Lemon Tart Ink. I attached the sentiment to a panel of Dark Indigo Ink I had splattered with white paint. 


The card is framed with the largest die in the Border Bling: Skinny Postage Frame Die. Then I added the sweet daisies to the edges of the card with the new Dainty Daisies Stamp Set and Dies


My second card features the new Lift Me Up Stamp Set and Dies. First a cut a piece of Aqua Mist Cardstock to fit the card front and then stamped the Brushed Plaid Stamp Set in Aqua Mist Ink. 


I stamped the images from the Lift Me Up Stamp Set, colored with Copic Markers, and die with the coordinating dies. I cut a frame from Pure Poppy Cardstock with the Border Bling: Skinny Diagonals Frame Die and added white cardstock stenciled with clouds behind the frame. 


I added glitter to the clouds and added a clear drops. 

Thanks for taking a look! I will be back tomorrow for Day 3 of sneak peeks. Stop by the Papertrey Blog for more more inspiration with the new products.

12/12/20

Ink to Paper December Sneak Peeks Day 2

I am back for Day 2 of the Ink to Paper December Release Sneak Peeks. Today I have some ideas to share for wedding cards and wedding favor boxes. Everything will be available for purchase beginning at 10 PM EDT on December 15th!

My first card features  the new Just Married Stamp Set and dies. On my wedding card I used both the chairs but I think just the Mrs. Chair would make a cute card for a bridal shower. I stamped the chairs in Versamark Ink and embossed with gold embossing powder. The flowers are colored with Copic Markers and then die cut with the coordinating dies. I also added flowers to the Mr. and Mrs. signs. 


At the bottom I added a sentiment from the stamp set. The background is blended with Sweet Blush and Spring Moss Ink. The card front is die cut with the Border Bing: Tin Stitch Die from Sweet Blush Cardstock. 


Next  created a favor box with the Wreath Favor Box Dies and the the Wreath Favor Box Sentiments Stamp Set and Dies. You cut the Wreath Favor Box Dies twice, fold on the score lines, and use double stick tape to put the box together. I used paper from the Bitty Big: Sweet Blush Color Collection


I used the Wreath Favor Box Sentiments Stamp Set to stamp the wreath, flowers, leaves, and sentiments. After I die cut all the elements I attached the wreath to the card front and stamped the sentiment at the bottom of the box. 

The Wreath Favor Box Sentiments Stamp Set and Dies are also perfect for card making. The wreath is pretty on its own. I added another sentiment from the stamp set in the middle of the wreath. 

I used the Ornate Cover Plate to add texture to the card front. I like the look of the white on white. In the middle of wreath I added the smaller frame in the new XO Heart Frames Dies. I added twine to the center of the card and tied a double bow at the top. 

Thanks for taking a look! I will be back tomorrow for Day 3 of sneak peeks. Stop by the Papertrey Blog for more more inspiration with the new products.


12/11/20

Ink to Paper December Sneak Peeks Day 1 - Anywhere Together

Thanks for stopping by! Today is Day 1 of the Ink to Paper December Release Sneak Peeks. December's Release is all about love, wedding, anniversaries, showers, and just showing our friends and family that we care. Everything will be available for purchase beginning at 10 PM EDT on December 15th!

I am starting off with two cards I created with the Anywhere Together Stamp Set and Dies. 


For my first card I went with a wedding theme. I just love the idea of the double bike, suitcase, and balloons! And the bike is so fun stamp! I cut a circle with the largest die in the Love to Layer: Scalloped Circle Die, and then blended ink in Lilac Grace and Spring Moss. I attached my stamped images to the circle with foam tape. 


I added two of the sentiments from the Anywhere Together Stamp Set. On the top half of the card I added a panel of patterned paper from the Bitty Big: Lilac Grace Color Collection. 


I used a white trim to set off the top and bottom of the card. 


I my second card I wanted to create a more masculine feel that could be given as a Anniversary card. I stamped the Nifty Plaid Stamp Set in Versamark Ink on True Black Cardstock and embossed with white embossing powder. 


I framed the bike with the new Border Bling: Skinny Heart Frames Dies. I stamped the sentiment on vellum with Versamark Ink and embossed with black embossing powder. 


Next up is a card created with the new Storybook Love Stamp Set and the XO Heart Frames Dies. The  Storybook Love Stamp Set coordinates with the previously released Storybook Christmas Die. I just love the idea of the books. You can play with your die cuts and come up with different arrangements for the books. I used the Woodwork Die to add the shelves at the bottom of the card. 


The card is framed with the new Border Bling: Skinny Heart Frame Dies. I added a piece of patterned paper from the Bitty Big: Aqua Mist Color Collection. I added the smaller dies from the new XO Heart Frames Dies at the top of the card. 

Thanks for taking a look! I will be back tomorrow for Day 2 of sneak peeks. Stop by the Papertrey Blog for more more inspiration with the new products.

12/9/20

Spellbinders December Large Die of the Month

Thanks for stopping by! Today I am popping in with a card I created with the Spellbinders Large Die of Month, Look Behind the CurtainThis month's "Look Behind The Curtain" large die set is perfect for making cards, decor, and more. Coordinates with the NEW Clear Stamp of the Month.

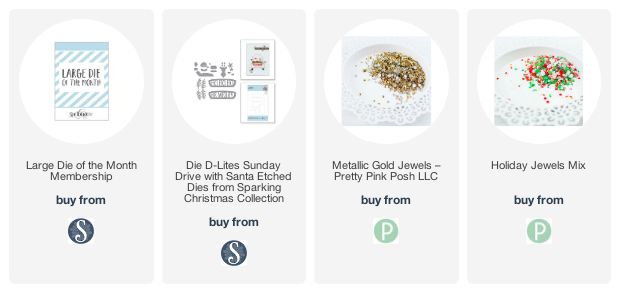
Join the Large Die of the Month Club and receive an expertly designed die set each month, complete with inspiration. Plus, members get store savings, extra deals, gifts, and more. Click Here to learn more about club membership. 

Membership Includes:

Exclusive Larger Set of Versatile Dies that cut, emboss, deboss and stencil. Double the size of the Small Die Set! $40 Value!

Project Inspiration: Each kit will feature project ideas with at least one detailed how-to instruction tutorial each month.

Member Benefits & Savings: Receive exclusive member pricing in the Spellbinders store. Plus receive access to deals, savings, and gifts - only available to members.


Look behind the curtain is a creative die that can be used throughout the year. You can put anything behind the curtain that you choose! Today I am going with a Christmas theme. The kit comes with detailed instructions on how to put the card together. 

First I cut the pieces for the curtain from white card stock and blended ink on the curtains with Peeled Paint and Olive Distress Ink. 


To embellish the curtains I added a few flowers and evergreen branches with die from the Die D-Lites Sunday Drive with Santa Etched Dies from Sparkling Christmas Collection. I added a sentiment at the top of the curtain and adhered a few Metallic Gold Jewls. 


Here is look with the curtain open. You pull the curtain rods to open the card. Inside I added a Christmas tree with a die for the November Large Die of the Month. 

Thanks for taking a look. You can find all the information about the Large Die of the Month Club here


12/8/20

New Like Gnome Other Kit from Taylored Expressions

Hi! I have a new kit to share with you today, Like Gnome Other. The kit is available now in the Taylored Expressions Store.  

Here’s everything included the Like Gnome Other Kit – which retails for $75:

  • Like Gnome Other stamp set
  • Like Gnome Other die collection
  • Build a Scene – Heart Fence & Hill die collection
  • Layer It- Toadstools die collection
  • Cable Knit Background stamp
  • Bit & Pieces – Hearts embellishments
  • 6 Custom Envelope Seals
  • 6 Colored Envelopes
  • Packaged in a zippered pouch with a custom kit label

You will also be able to purchase additional envelope seals separately!


The gnomes are so cute and I know I will use the picket fence die over and over! I started by creating the background. I stenciled the clouds with the Set the Scene - Cloud Stencil Strip and Salt Water Taffy Ink. I added grass at the bottom with Mint Julep and Cilantro Ink. I added the clouds with Rainbow Cloud Duo, sold separately. 


I stamped a few flowers from the stamp set. The flowers and gnomes are colored with Copic Markers. 


I used the hearts in the Bit & Pieces – Hearts embellishments included in the kit, to accent the fence. The sentiment is also part of the kit. 


On my second card I created the background with the Cable Knit Background stamp. I stamped in Versamark Ink on Sugar Cube Cardstock, embossed with TE White Embossing Folder,  and then blended Granny Smith, Salt Water Taffy, Cupcake, and Potato Chip Ink. 


I cut a circle in the card front with Stitched Circle Stacklets and framed the circle with the Inside Scallop Circle Stacklets. 


Used the Layer It- Toadstools die collection from the kit to created the toadstools. I added a few toad stocks inside the circle and above the sentiments. 

Be sure to stop by the TE Blog for all the details and more inspiration!